Articles by "Mobile Tricks"
Showing posts with label Mobile Tricks. Show all posts
Droidadda is one of worlds best online blogging portal where latest trending articles on Android,Blogging,Seo,Gadgets,Tricks,etc are daily published.
Enable Double Tap to Wake/Sleep on Android

Double Tap 2 Wake or Double Tap to Sleep as its name suggest is a feature used to put the mobile device on sleep mode or recover back from sleep mode to normal mode by just tapping twice onto the screen. It is an important feature developed on android & also its quiet amazing too. With the help of this feature users can control their smartphones from battery draining due to "Screen on Time" also called SOT by just tapping on their screen.

Double Tap to wake/sleep is one of the best features in the custom ROM right now. If you want to enjoy this feature on your custom ROM then you can head over to “Settings & Display” and turn on this feature. If you have the stock ROM then you can’t turn it on your device. Today i'm going to tell you the way you can easily enable double tap to sleep on any Android device.

There are a lot of application available on play store which allows you to enable double tap to sleep feature but all of the application requires root, and some of the applications are not working well on many devices.

If you have a stock ROM on your device and afraid of rooting your device and enjoy the double tap to sleep feature then you can download an application called as easy lock which helps the users to lock their device by double tapping on the status bar of your device or your lock screen.

Also Read: How To Install Arise Fx On Your Android Device
Easy Lock is developed by an XDA Senior Member Aravind Sagar. The best part about this application is that it is ad-free, and there is an in-app purchase, but the app was removed from play store. You can enjoy this application on your device.

Enable Double Tap to Wake/Sleep on Android

    Enable Double Tap to Wake/Sleep on Any Android Device (No Root)

    Android is best when it comes to the shortcuts. If you have issues in reaching the power button or your power button to lock your device every time, then you can install the easy lock application on your device.
    There are many settings in the application such as it allows the users to select the double tap time. If you accidentally touch, then it won’t lock your device.
    Easy Lock has the feature to lock your device if you double tap on Status Bar, Navigation Bar, Lockscreen, and notification shade which will allow you to put your device to sleep quickly.
    There is some permission required you need to start before using the application on your device. You need Admin permission, Draw over other apps, App usage statistic. You need to enable this option on your device.
    Also Read: How To Install & Enable Google Assistant on iPhone

    How to Enable Double Tap to Sleep on Any Android Device

    • Download the Easy Lock application from the link given below: ( Red box button )
    • Install the application, and you might get an unknown source warning. Click on “Settings“.
    • Scroll down and enable the unknown sources and try installing the application again.
    • Open it, and you will find that application needs Admin access to work. Click on "Activate".
    • Now, you need to enable the draw over other apps settings so click on “OK.”
    • Allow the access to draw over other apps, and that’s it!
    • Turn on the application and then enable double tap anywhere to lock.
    • That’s it! You have successfully installed the application on your device. Click on the status bar twice, and you will see your device will be locked.
    • You can change the settings of the application according to your choice. If you want you can also hide the notification of the application. Make sure that you don’t force close the Easy App Lock.

    Final Words

    This was the article on Lawncher for Android. I hope you'll like this article. If you need any extra help completing this guide, then you should tell me in comments. If installation fails, then the only thing that you need to do is to try and repeat the whole tutorial more than once.
    Also Read: Why Your Smartphone Heats up? Here's a Quick Reference.
    Thankyou for visiting Droidadda. For fast access to our service Bookmark & Subscribe us now. Share this article with your friends and show how they can customize WhatsApp. If any issues then feel free to comment below. Peace out.
    Droidadda is one of worlds best online blogging portal where latest trending articles on Android,Blogging,Seo,Gadgets,Tricks,etc are daily published.

    As we all knew, Android O is the latest version of the Android which will be coming soon in the month of August or September on some of the leading smartphones. Android O Developer Preview 2 came with the new features in which one of the feature was the notification dots. Whenever you receive any notification, you will see a dot on the screen. If you have Nexus, Pixel or any other smartphone, then you need to wait for some months for this feature. Today, I will tell you the way you can enable Android O notification dots on any Android device.

    Also look: How to Install Android O Emoji on Any Android Device

    We have seen the feature of notification badges in the devices such as Samsung. Today, I will tell you the way you can get this feature on any Android device but this will be totally different.
    You might have used the launchers on any device. Today, I will show you the way you can enable those feature with the help of the Nova Launcher which will help you to enable the Android O notification dots on your device.

      What is Nova Launcher?

      Nova Launcher is the application which helps you to change the look and feel of your Android device. Suppose if you have Android Jellybean, and you need to enjoy the look and feel of Android Nougat then you can do the customization in your launcher and enjoy Android N features.
      Also Look: How to Install Android O Theme on Your Any Android Device

      Now, the new Beta version of the Nova launcher is up, and you can enjoy the notification dots on your device too if you enroll yourself to the beta version of the nova launcher.
      Recently, Cliff Wade from TeslaCoil posted a changelog on XDA and came up with the new features in the latest beta of Nova Launcher.

      Changelogs:
      • Dots! Android O style notification badges.
      • Round search bar style.
      • Performance improvements.
      • Minor fixes for Android O.

      Enable Android O Notification Dots on Any Android Device

      We have seen the Samsung earlier devices was having the feature of notification badges. We have seen stock Android never came up with the feature of notification badges. Now, Android O is coming with notification badges.
      If you want to enjoy the notification dots on your Android device, then you need to pay 4.99$ to buy the Nova Launcher Prime. This feature is still available for the beta users. If you want to enjoy this feature on your device, then you need to enroll yourself to the beta version and buy the software.
      Also look: How to Enable Android O Boot Animation on Any Android Device
      Personally, I don’t like the notification badges just because it keeps on showing us the number of how many messages you have got. I love the new feature which is coming in Android O, and you can use this feature on your device too with the help of Nova Launcher.

      How to Enable Android O Notification Dots on Any Android Device

      • Download and install the Nova Launcher Prime on your device from below link.
      • Now, enroll yourself to the beta version of the Nova Launcher from below link. Click on Become A Tester, and after 15 minutes you will receive the update of the new beta version.

      • Now, you can wait for 15 minutes for the beta version of Nova Launcher, or you can simply download the Nova Launcher from below link.
      • Go to Nova Launcher Settings and there you will see “Notification Badges” click on it.


      • You will see an option of the “Dots” Tap on it, and you can customize the Dot feature.
      • Now, whenever you receive any notification then you will see a Dot on the application.

      Video Tutorial


      Final Words

      This way you can enable Android O notification dots on any Android device. I hope you love this article. If you hold on the application, it won’t show the notification or message yet. You need to wait for some days, or you can also install the Android O Developer Preview 2 Pixel Launcher on your Android device.
      If you love this Launcher then I will suggest you to buy this launcher and enjoy the latest beta version of nova launcher and there are many features of this launcher.
      Share this article with your friends and do let them know about this amazing feature of this launcher. I hope they will love this article.
      Thank you for visiting Droidadda and keep visiting for more tips and tricks like this and I will meet you in the next one with some more features of Android O. If you have any issues then please feel free to comment below and I will surely help you out.
      Droidadda is one of worlds best online blogging portal where latest trending articles on Android,Blogging,Seo,Gadgets,Tricks,etc are daily published.

      Hello Everyone, I Have Come Up With A Guide About Mobile Bricking And Differences Between A Hard Brick And Soft Brick Mobile. First Of All, Lets Get Something Straight. Most People Use The Term "Bricked" Improperly. A Bricked Phone Means One Thing: Your Phone Won't Turn On In Any Way, Shape Or Form. The Word "Brick", When Used In Reference To Consumer Electronics, Describes An Electronic Device Such As A Smartphone, Game Console, Router, Or Tablet Computer That, Due To A Serious Misconfiguration, Corrupted Firmware, Or A Hardware Problem, Can No Longer Function, Hence, Is Technologically Useful As A Brick.


      Difference Between Hard Brick And Soft Brick Mobile :


      Hard Brick

      Hard Bricked Devices Generally Show Little To No Signs Of Life. A Hard Bricked Device Doesn't Power On Or Show Any Vendor Logo, In Essence, The Screen Remains Turned Off. Some Of The Major Reasons For Hard Bricking Are Installing Firmware Not Made For The Device, Interrupted Flashing Procedure

      A Flashing Procedure Incorrectly. Some Other Reasons Include Flashing A Root File For A Different File Or Using Wrong Commands. Some Kernel Bugs Have Been Known That Affect The /data Partition In The EMMC Chip, Which Gets Corrupted During Certain Operations Such As Wiping And Flashing. Recovering From A Hard Brick Is Generally Considered Difficult And Requires The Use Of A More Direct Programming Interface To The Controller. However, Additional Tools Or Connections May Be Needed.

      Soft Brick

      A "Soft Bricked" Device May Show Signs Of Life, But Boots Unsuccessfully Or May Display An Error Screen. Soft Bricked Devices Can Usually Be Fixed; For Example, A Soft Bricked IOS Device May Display A Screen Instructing The User To Plug It Into A Computer To Perform An Operating System Recovery Using ITunes Software.A Soft-bricked Device Is Only Half-way Dead. In Most Cases Something Went Wrong While Flashing Something Like A Custom ROM, Camera Mod Or App In Your Custom Recovery Mode. Because Of This, Your Device Is Not Booting Anymore (the So-called Bootloop) Or Is Constantly Crashing. The Basic Solution To This Problem Is Flashing A Clean & Working Version Of Android To Your Device.


      Droidadda is one of worlds best online blogging portal where latest trending articles on Android,Blogging,Seo,Gadgets,Tricks,etc are daily published.
       
      Hello Friends ! Today i'll share an amazing tweek for all the Android users. This is "Lspeed Flashable Lightening Mod". This script has the ability to improve your device performance and stability.


      Performance boosters generally get a bad rap, but that doesn't mean they should all be dismissed—particularly when they're as well thought out as the latest work from developer Danijel Markov & +Sunmughan Swamy . After recognizing a few inefficiencies in the way Android handles memory management and other system-level functions, he created a flashable ZIP that will apply many fixes in one fell swoop.
      Markov's mod, dubbed "L Speed," offers a command prompt interface for optional fine-tuning, but can easily improve performance without any adjustments. By default, the ZIP applies several kernel tweaks, RAM optimizations, and CPU calibrations that should give almost any Android device a hefty boost in performance and battery life.


      Requirements


      Step 1 Download the L Speed Flashable ZIP

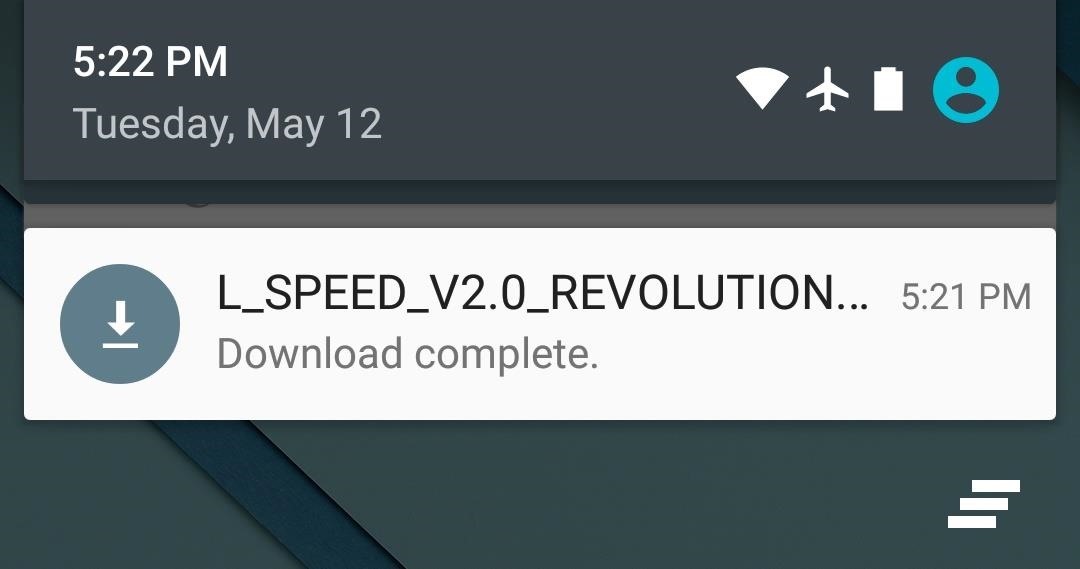
      To begin, point your device's web browser to this link given below, and the L Speed flashable ZIP should begin downloading automatically. When the file has finished saving to your device, go ahead and boot into custom recovery.


      Step 2 Create a Backup (Optional)

      Before you flash this ZIP, make sure you have a NANDroid backup on standby. If anything goes wrong or if you want to undo this mod, the easiest way to get things back to normal would be to restore that backup.

      Step 3 Flash the ZIP

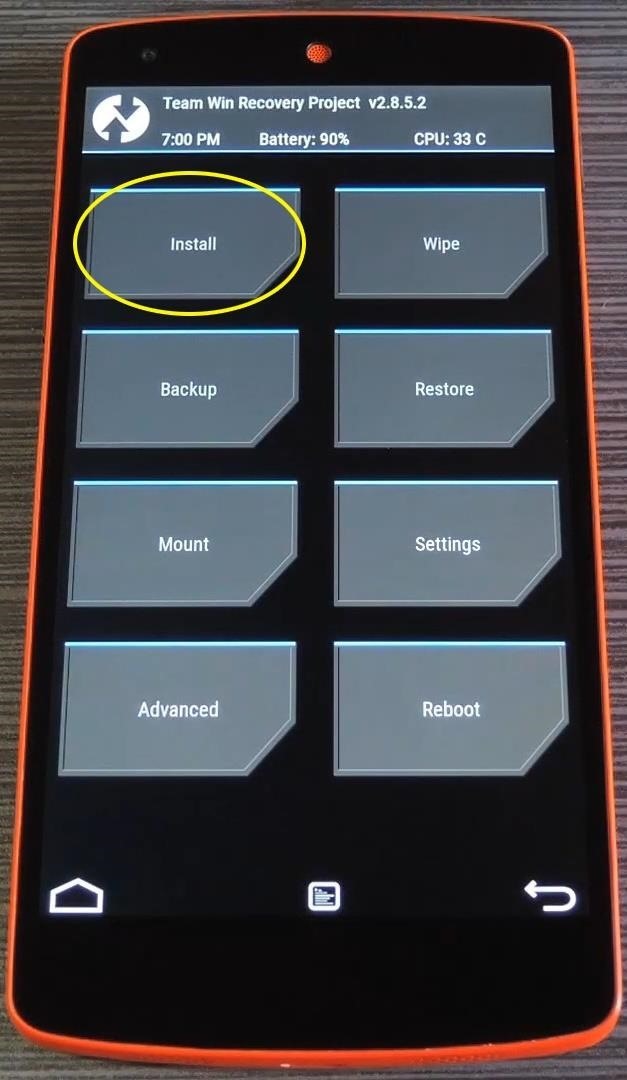
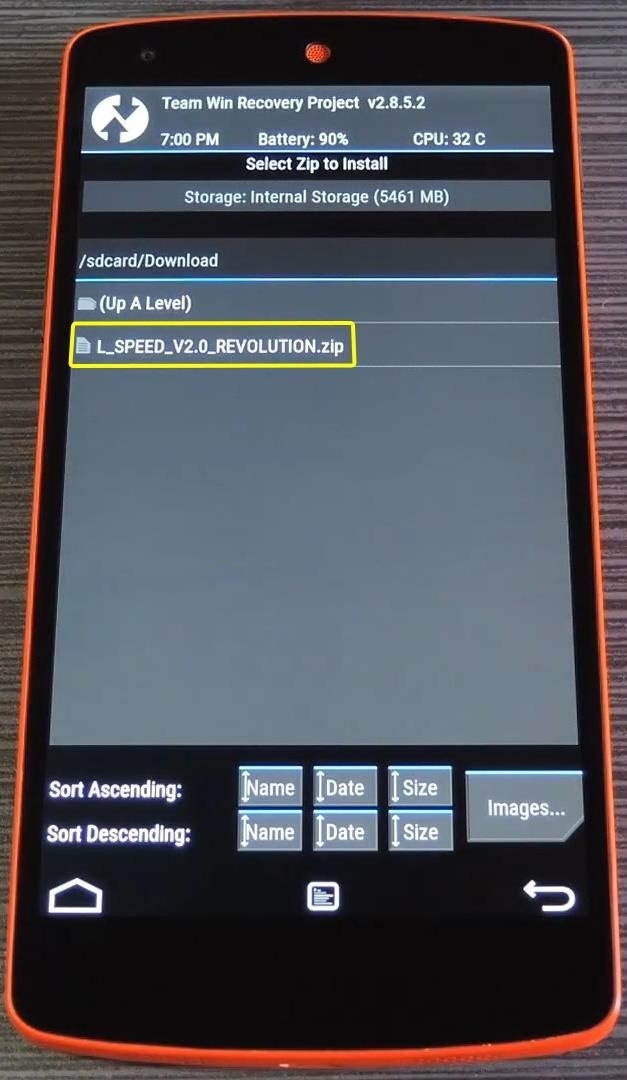
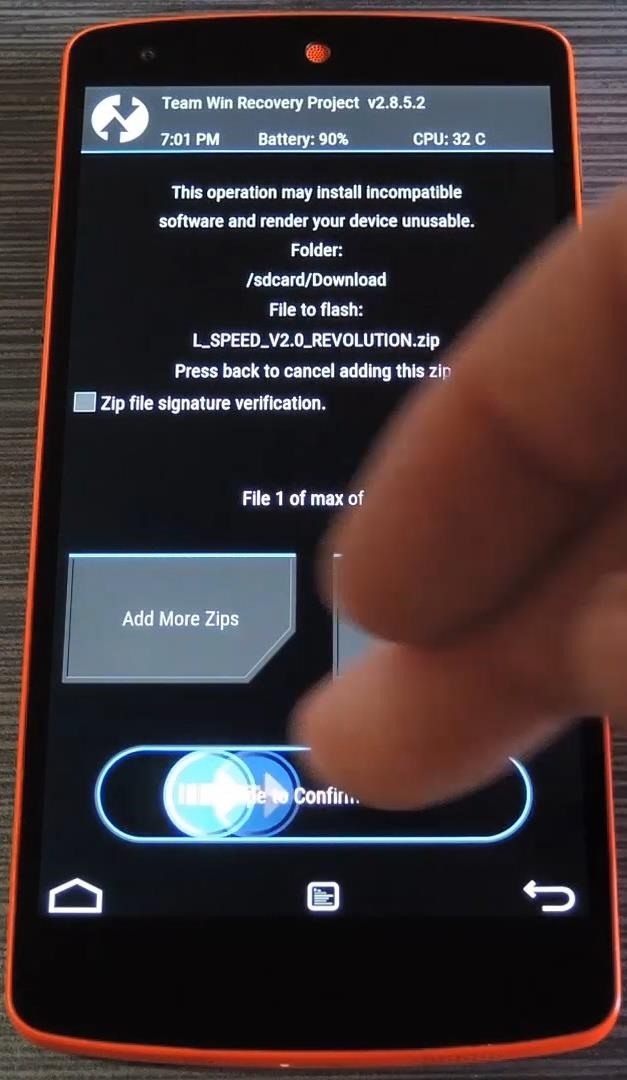
      Go ahead and tap the "Install" button from TWRP recovery's main menu. From here, navigate to your device's Download folder, then select the "L_SPEED.zip" file. After that, just swipe the slider at the bottom of the screen to install the mod, and when that's finished, tap "Reboot System."


      When you get back up, many system tweaks will have already been applied to your device. By themselves, these tweaks should make a noticeable difference in your device's performance and battery life, but if you'd like to customize L Speed a little more, read on for a guide on the command prompt interface.


      Step 4Customize L Speed Settings (Optional)

      To fine-tune some of the L Speed optimizations and even enable a few additional options, start by downloading an app called Terminal Emulator for Android.


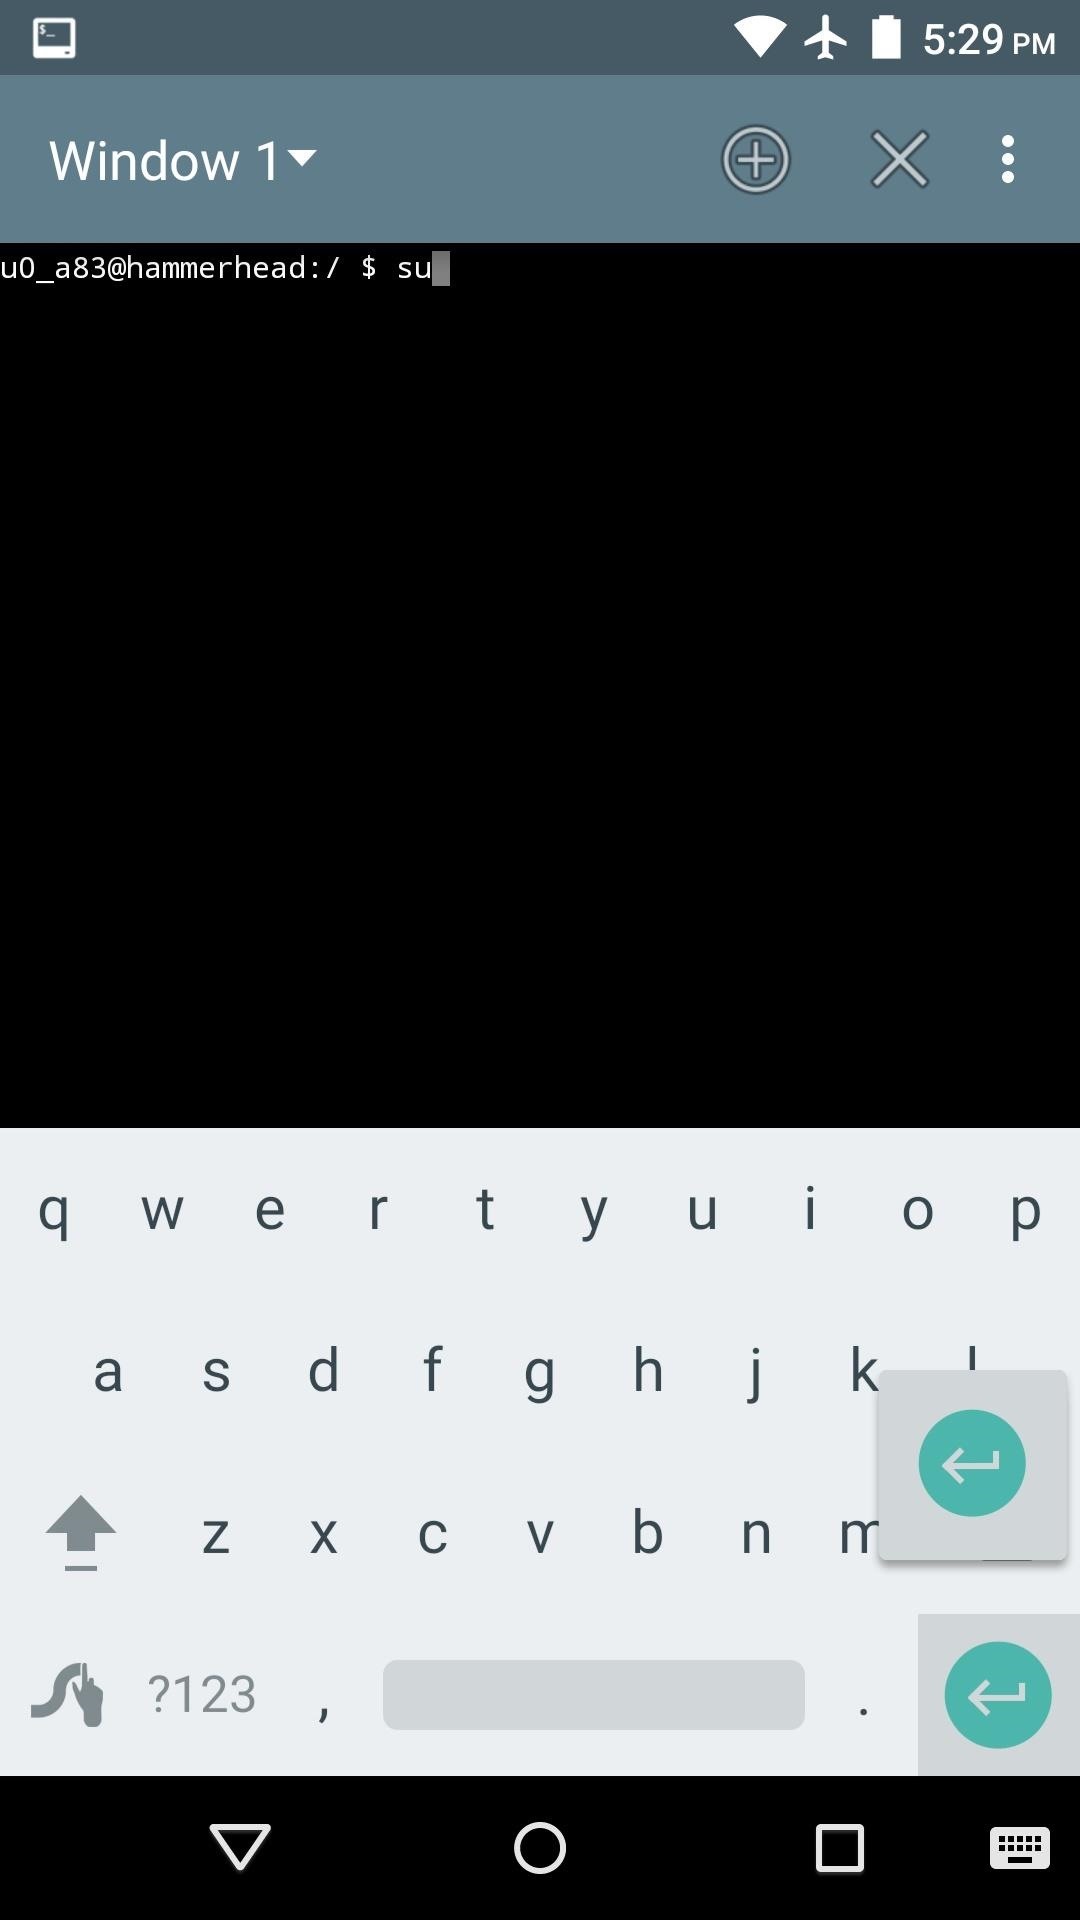
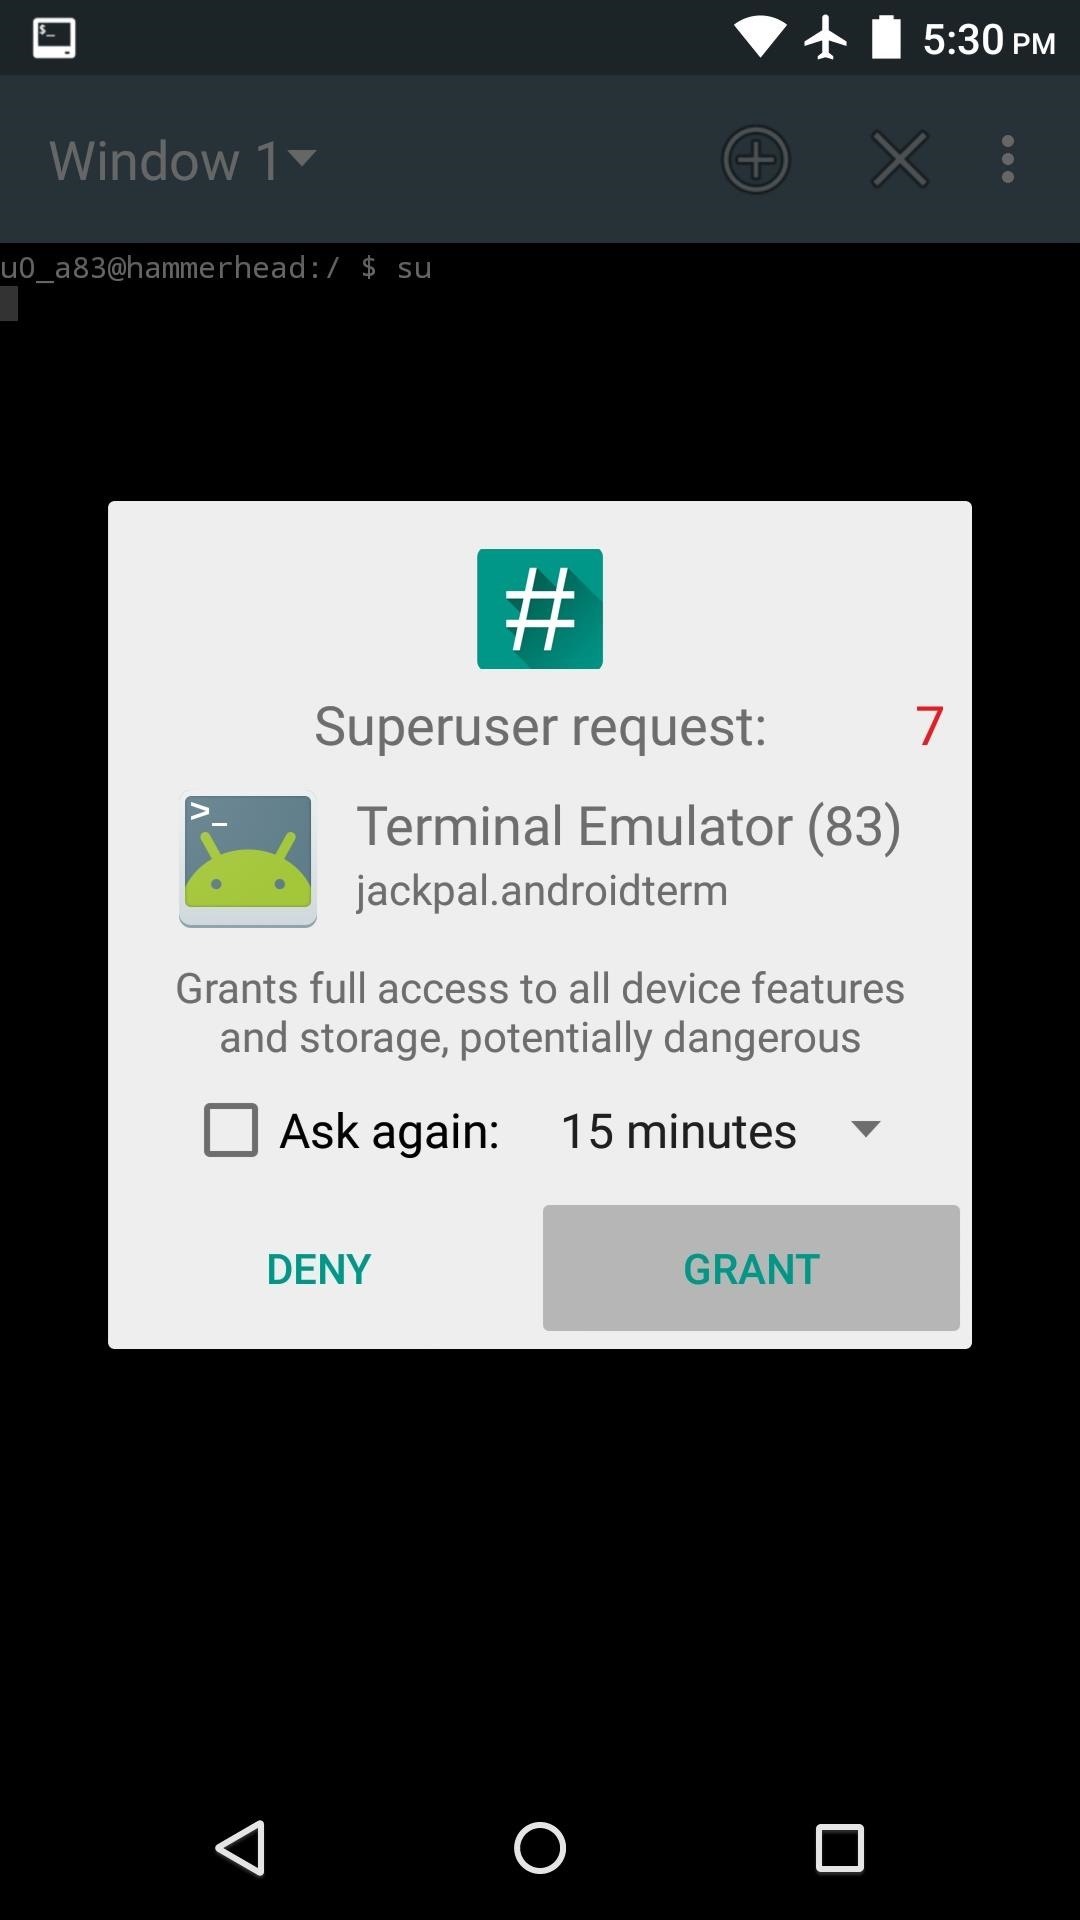
      After installing Terminal Emulator, go ahead and open the app and type su, then hit enter. From here, the app will ask for Superuser access, so tap "Grant" on the popup.


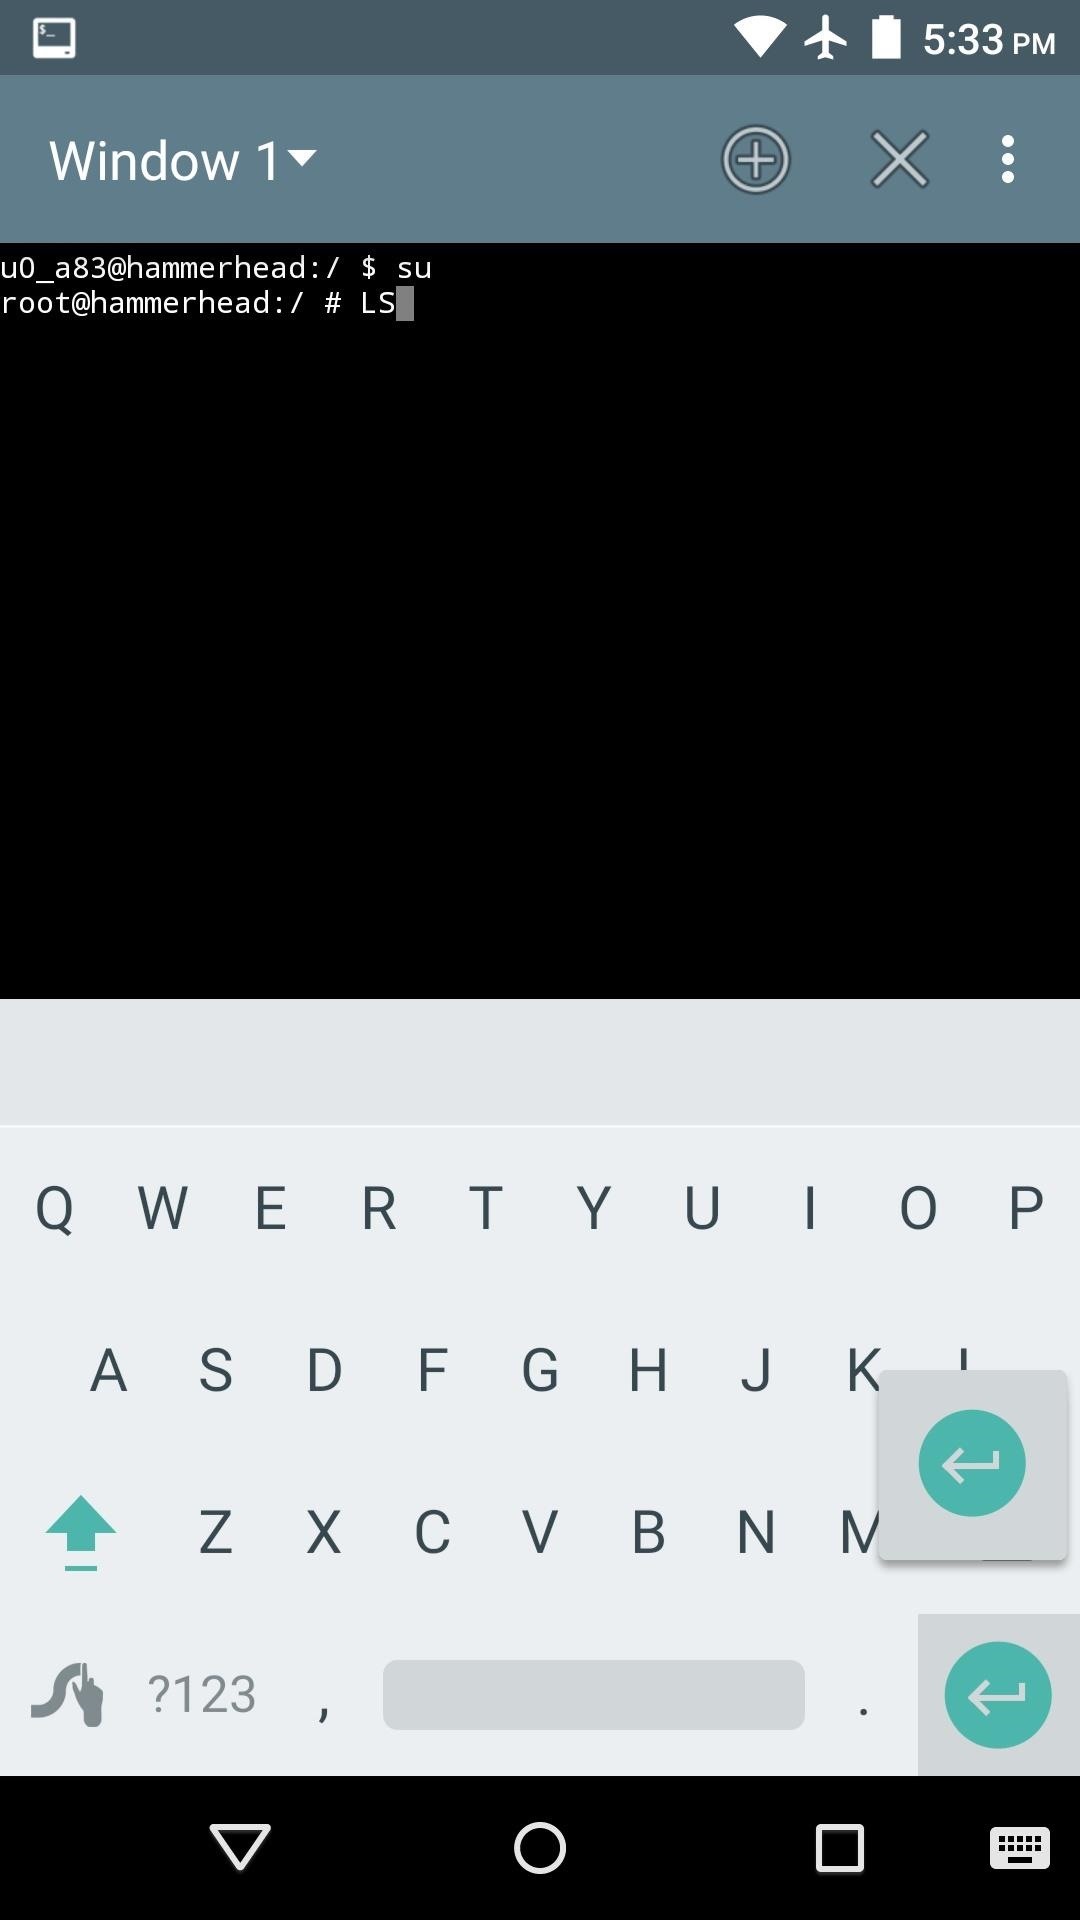
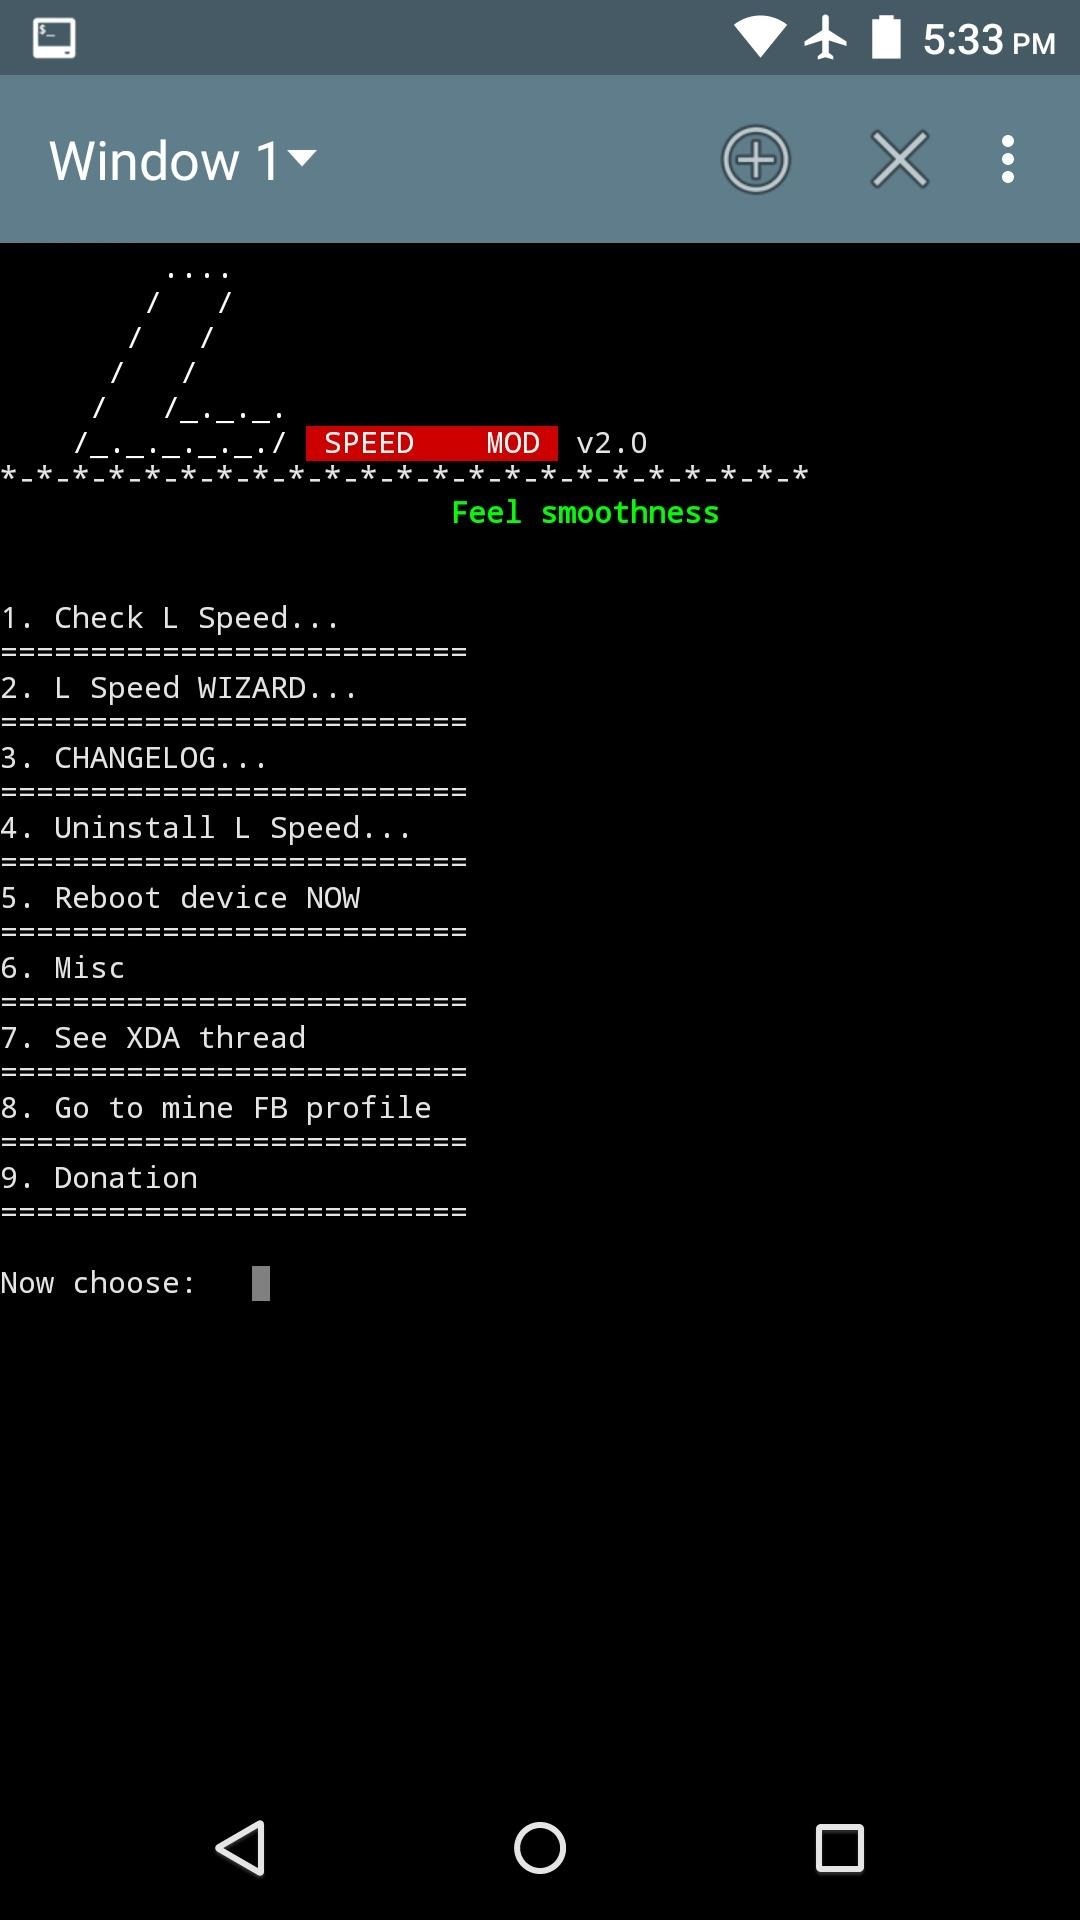
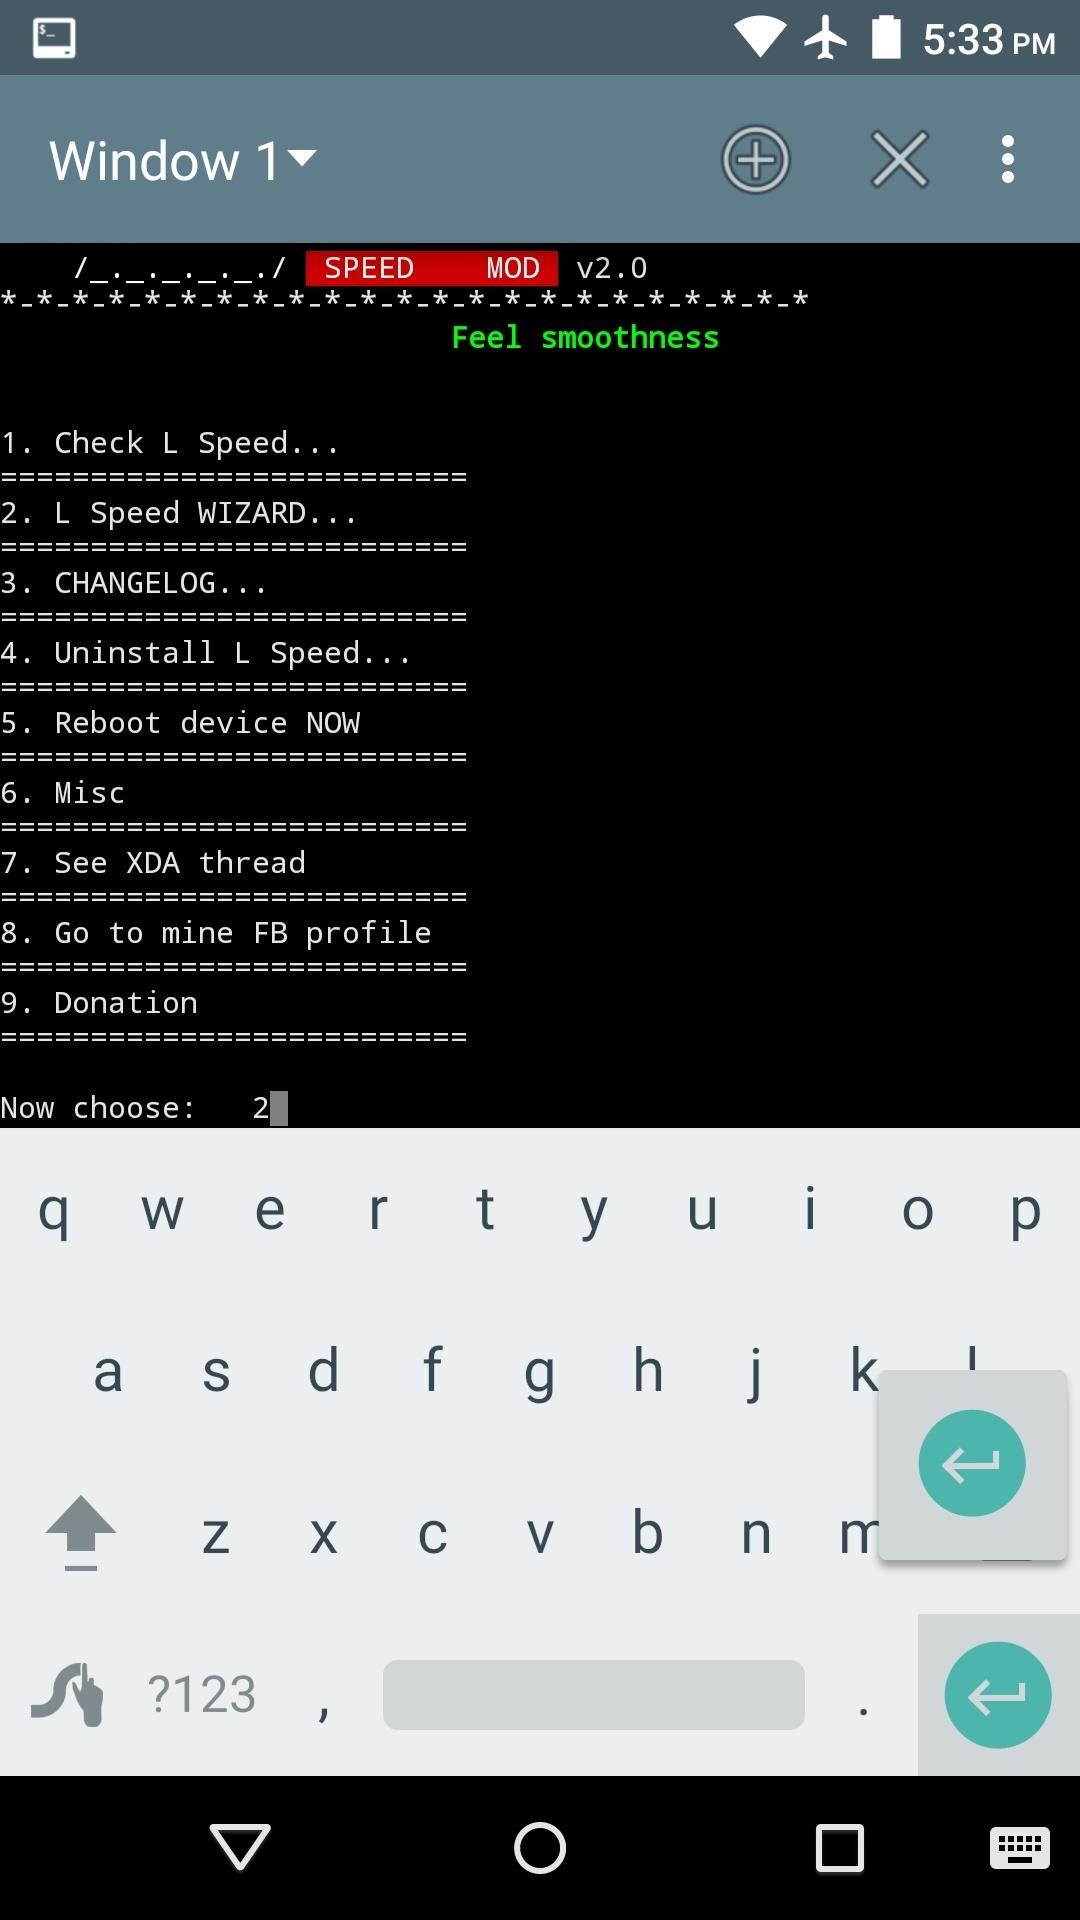
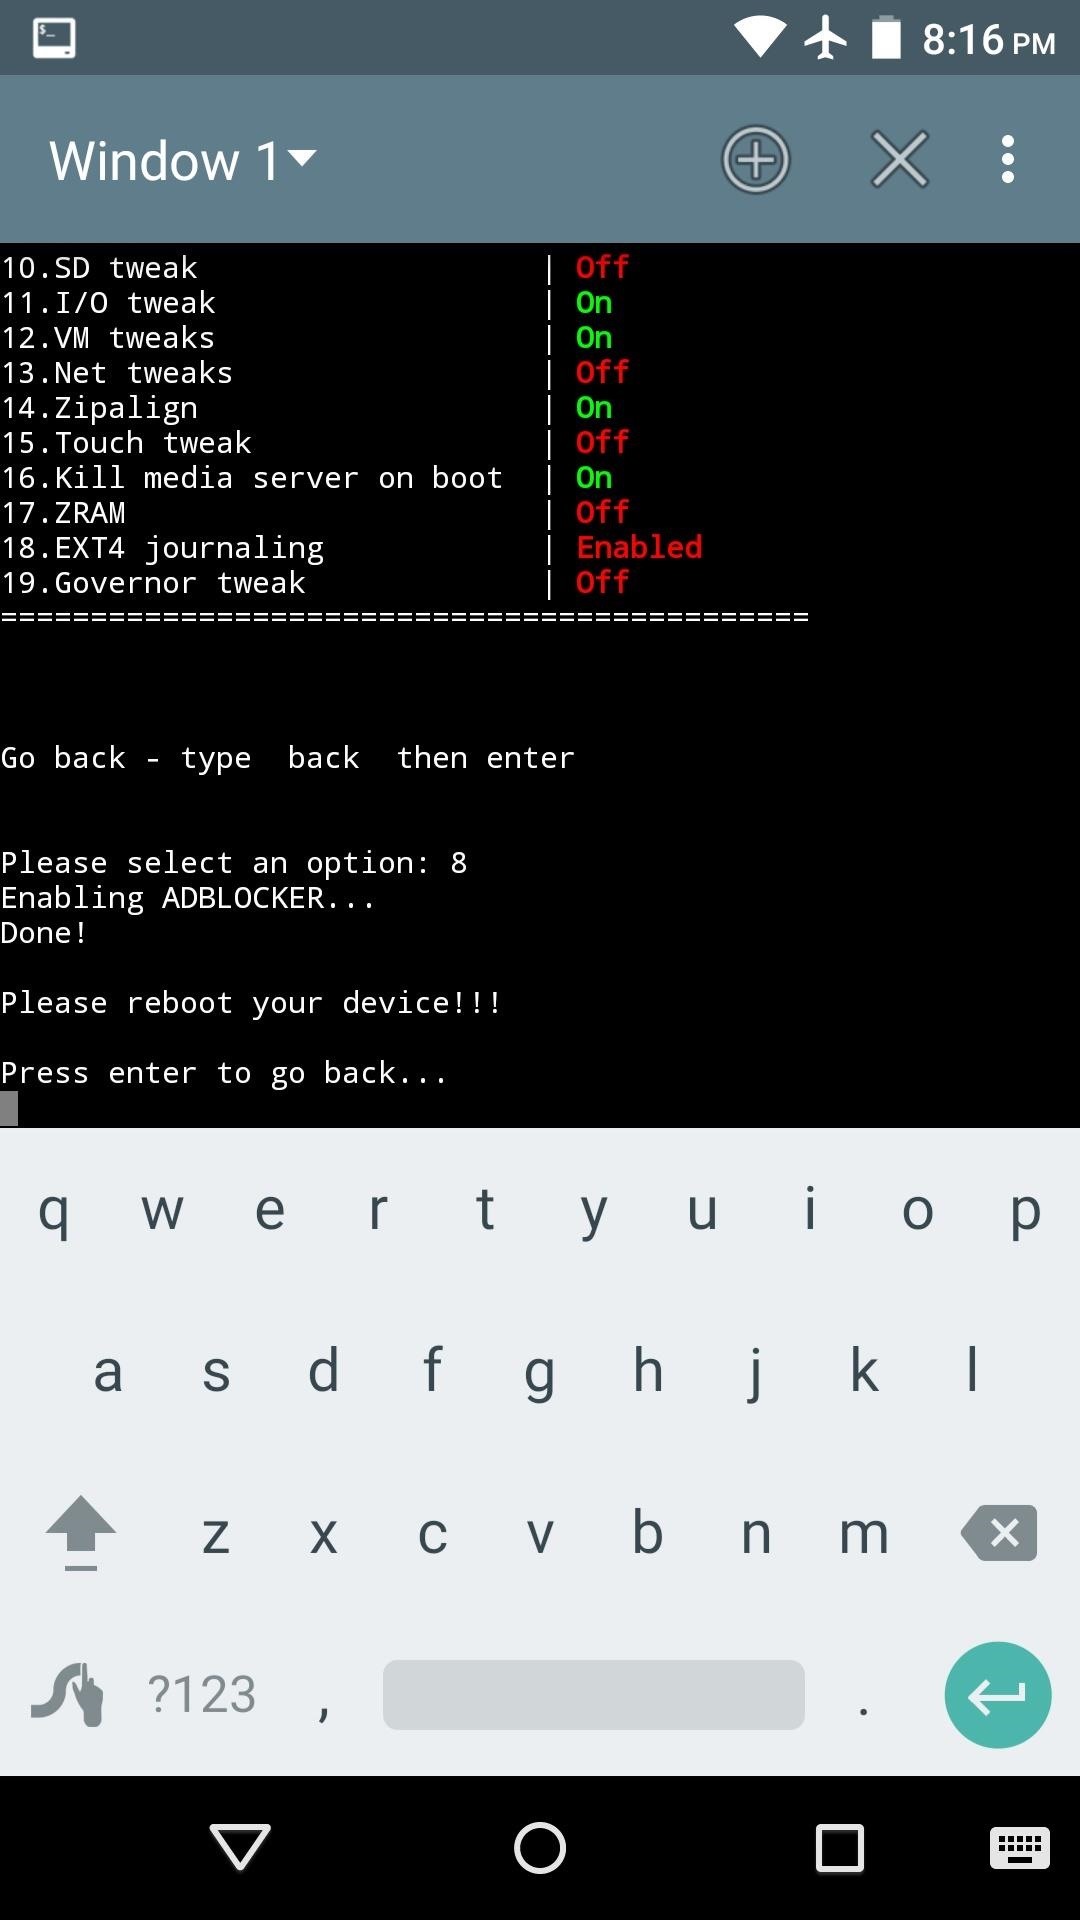
      Now that Terminal Emulator has root access for this session, type LS and hit enter to access the L Speed menu. From here, enter the number 2 to access the L Speed settings wizard.


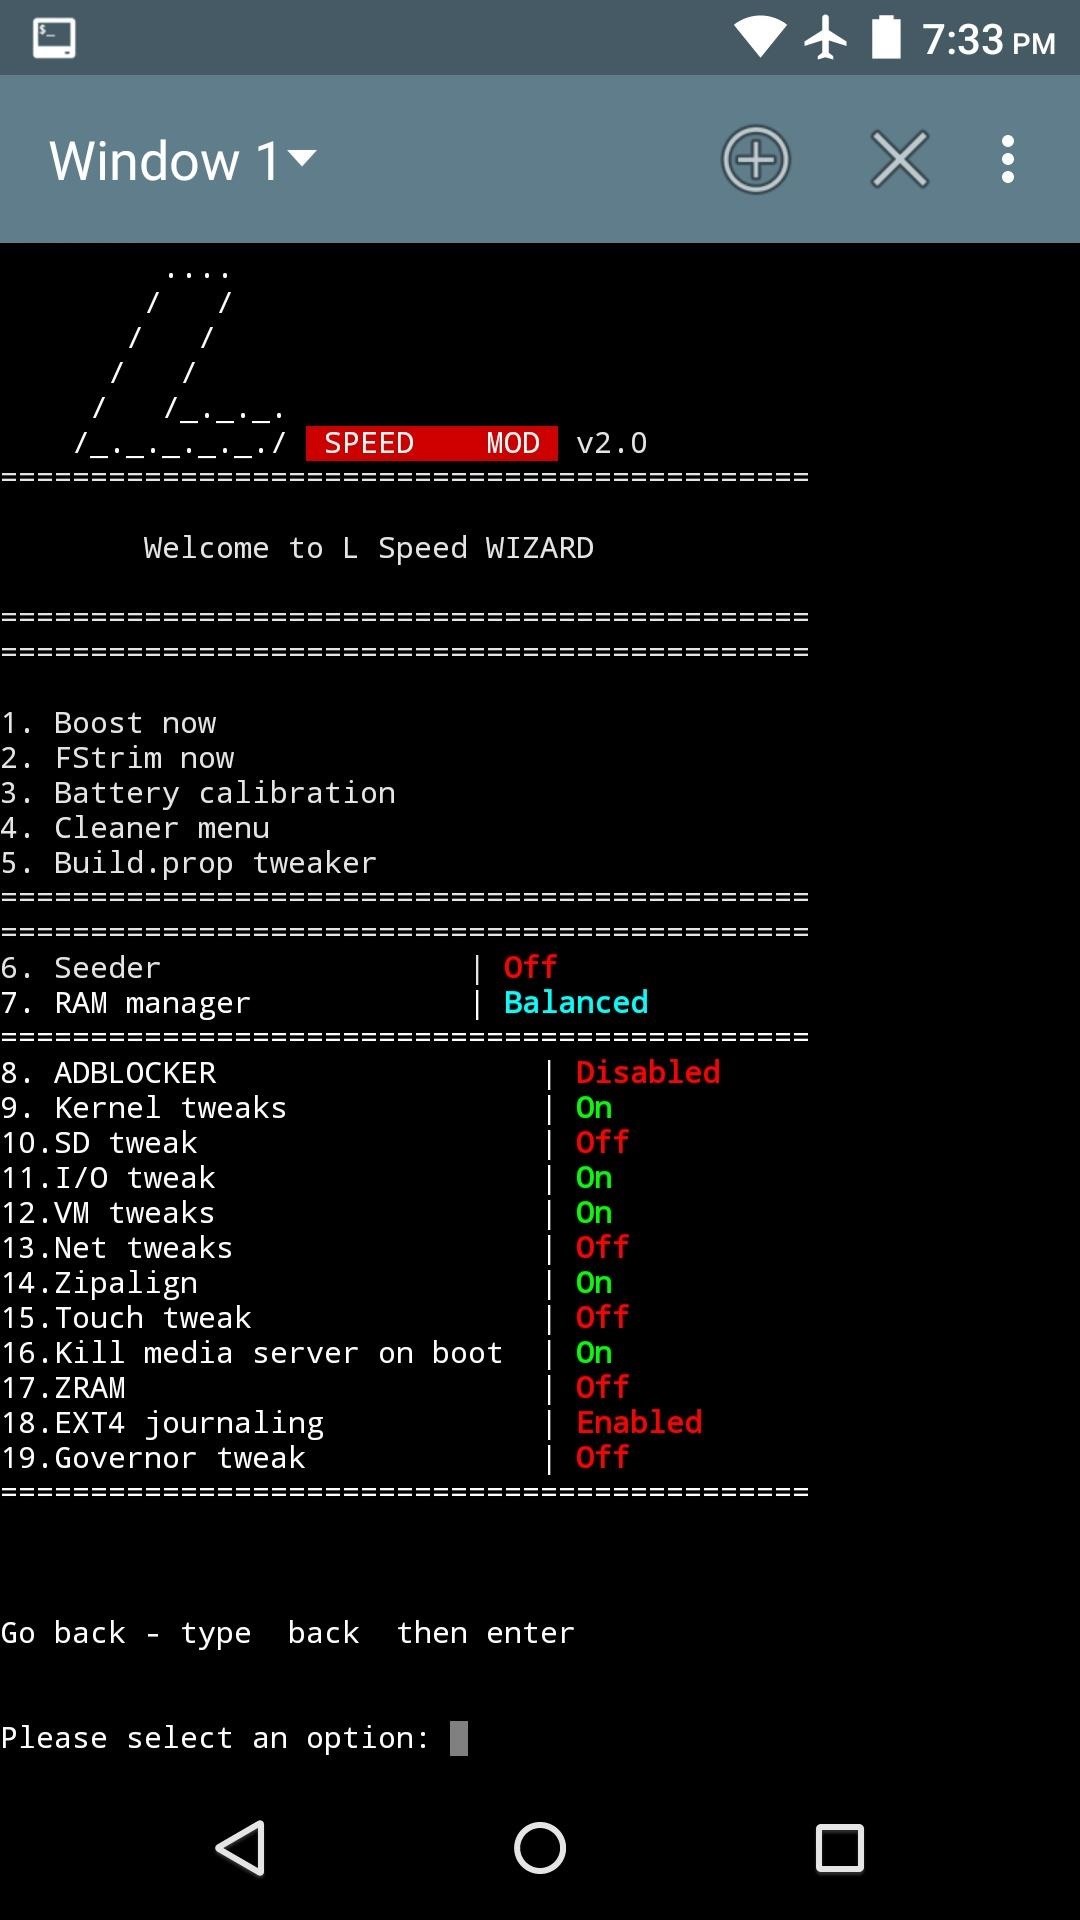
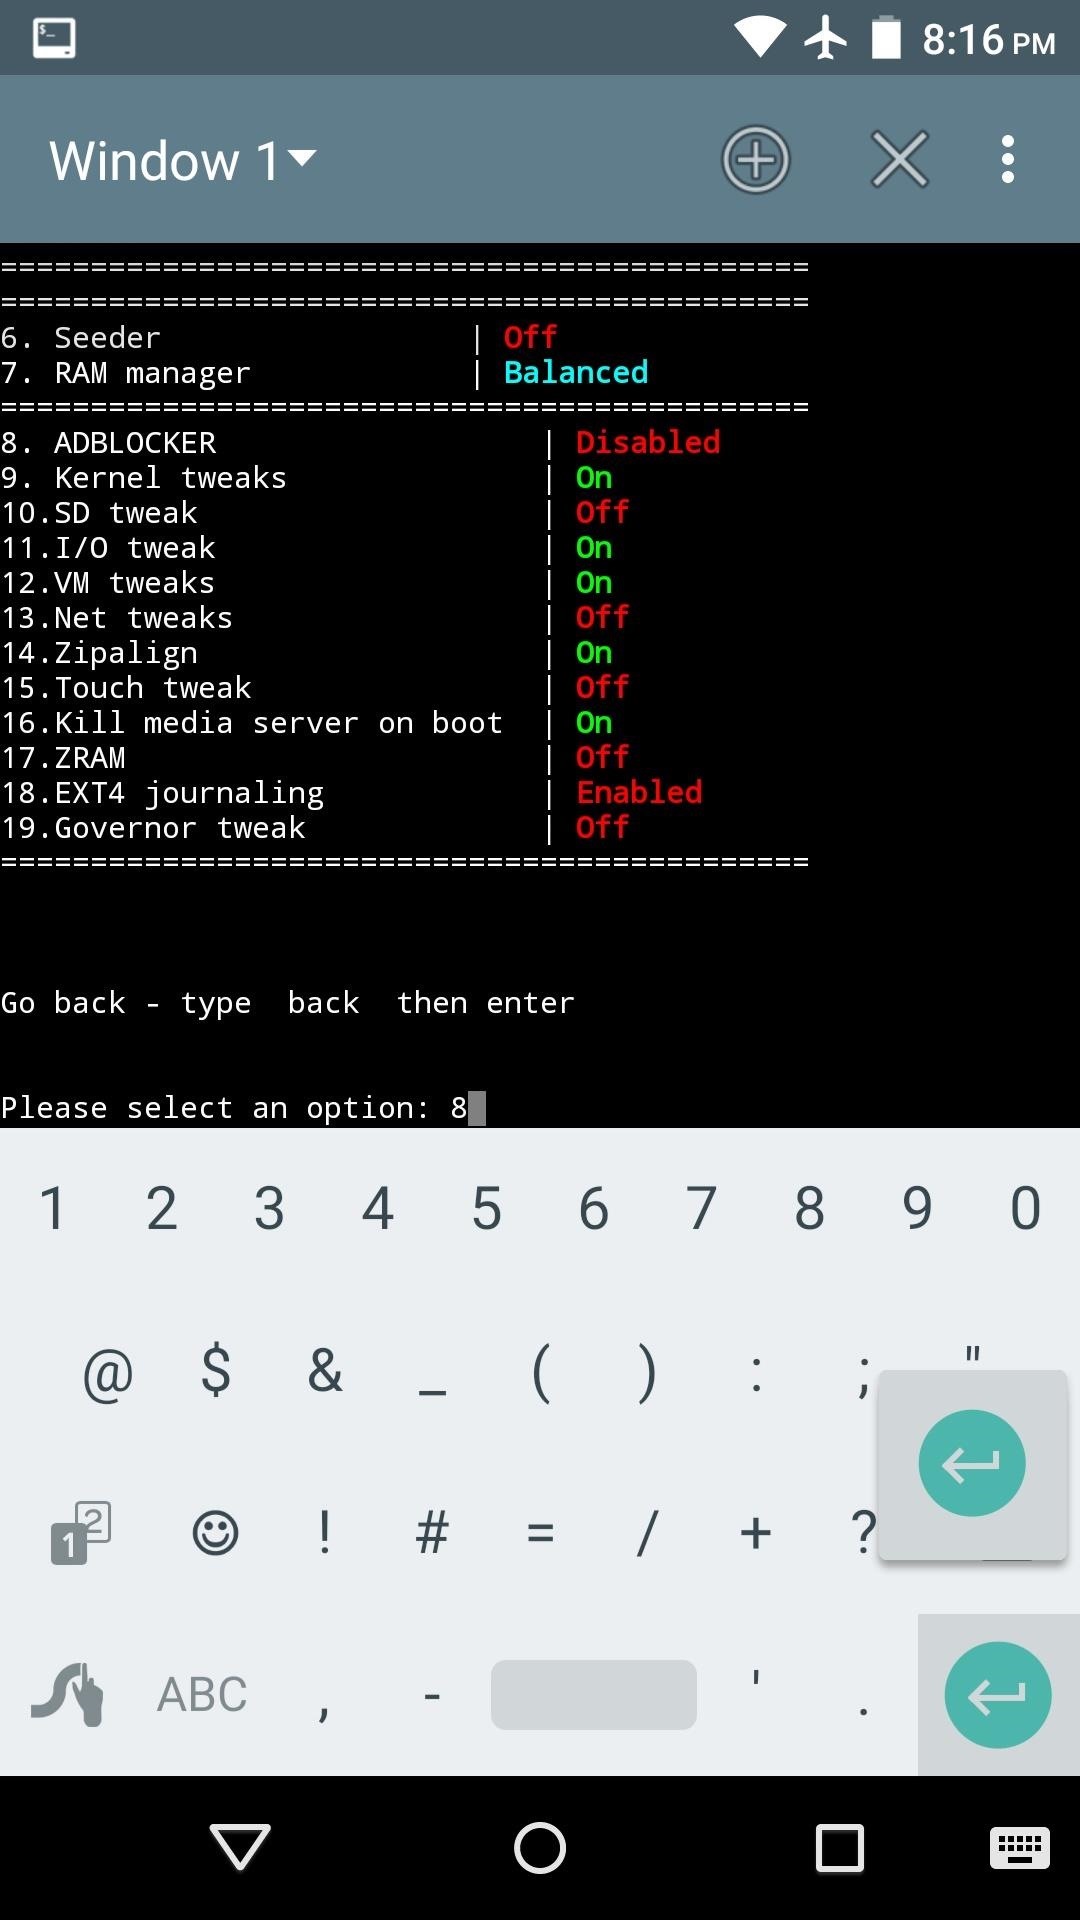
      From here, there are several different RAM, CPU, and kernel tweaks that you can enable or disable, and each has a corresponding number. To toggle one of these features on or off, simply type in the number and hit enter. Most changes will require a reboot before they'll become active, so apply any tweaks that look good to you and reboot your phone. 


      How well has your device performed since installing L Speed? Let us know in the comment section below, or drop us a line on Android Hacks' Facebook or Twitter, or Gadget Hacks' Facebook, Google+, or Twitter.
      Droidadda is one of worlds best online blogging portal where latest trending articles on Android,Blogging,Seo,Gadgets,Tricks,etc are daily published.
      Alright, so you turned off your iPhone one night and you wake up the next morning and your iPhone comes on but its stuck at the apple logo. I had the same exact problem. Do not fret, because today I will show you few steps that will help you Fix iPhone Stuck on Apple Logo issue and you get your beloved Apple iPhone back up and running.
      First, we have to find the source of your problem. Most of the time this iPhone Stuck at Apple Logo problem comes when you or someone else tries to jailbreak your phone. What is jail-breaking? It is when you free your phone from the limitations of the operating system present. Lets be completely honest. They put these limitations up here for a reason. So outside viruses would not corrupt your phone.

      Fix iPhone Stuck on Apple Logo

      Just like the state makes laws so everyone won’t be robbed by tomorrow. It’s just the same. Sometimes jail-breaking is not always source of the problem.
      ok, So shall we have a look on steps to Fix this problem after jailbreak?


      How to Fix iPhone Stuck on Apple Logo Issue


      Step 1: Turn off the iPhone

      To turn off your iPhone you need to turn it on. So turn your iPhone on back to the dreaded screen as normal. When the phone is on hold the sleep/ off button while also holding the home button
      If you don’t know where these buttons are; the sleep/ off is on top of your phone. The home button is the only button that is on the same side as the screen. Do this until the phone turns off.

      Step 2: Turn the phone on

      When you turn the phone back on hold the sleep/ off button while holding the volume up button.

      Step 3: Get the phone working

      While holding the sleep/ off button and the volume up button, wait for it to turn on. As soon as the phone comes on with the logo, let go of the sleep/ off button. Do not let go of the volume up button.

      Hold it until the phone gets back up and running. This can take several minutes but do not give up on it. You can very much assume that you have almost solved your iphone stuck on apple’s logo issue on your own.

      Step 4: Leave it alone

      Once the phone is back up and running do not bother it. Leave your phone alone for about 30 minutes. Your phone is rather glitchy now and toying with it will make it worse. You can even put it back in the state that it was in.

      That’s pretty much it. Your phone is fixed. If you are still experiencing this problem then you might want to send the phone back to Apple and let them run a diagnostic to fix it. This is how one of my friend fixed iPhone Stuck on Apple Logo issue on his own and I hope this little tutorial proves to be helpful for you too .
      Droidadda is one of worlds best online blogging portal where latest trending articles on Android,Blogging,Seo,Gadgets,Tricks,etc are daily published.


      Everyone has their own Reasons of having password on their phone. Most of the time its about Security Reasons and to avoid unauthorized access but the real problem occurs when you fail to remember or forget your Password. In such situations, only thing that comes in mind is to factory reset the phone so that you can start all over again with new password.
      Today we will be discussing and sharing Steps on How to Factory reset iphone without password. So in Case you have forgot your password. Or you just bought an iphone from someone but its password protected. Or  May it be any reason you want to factory reset your iphone and don’t know the password, You are at the right place.

      Before we proceed with steps to tackle with this issue, you need to make sure that your phone don’t have iCloud Activation, Because if you have Find my iphone activated then that means when you do reset your phone you won’t be able to login. It will ask you for the Password. Ok so Let us Get started and see how to factory reset your iphone without password.

      Steps to Factory Reset iphone without Password

      Things you will need to perform this Method are:
      1. iTunes Installed on your PC.
      2. USB Cable
      Once you are ready with above mentioned things, we are ready to proceed. This Factory reset without password Method works on all iphones 6/5s/5c/5/4s/4/3gs/iPad or iPod.
      Step 1: First of all we will power off the phone. What we will do is keep holding Sleep/wake Button and Slide to Power off.

      Step 2: Now you need to start iTunes on your Computer and make sure USB Cable is attached to it. Now Hold Home Button and then insert USB data Cable into your iphone. 

      Step 3: You will be presented with Connect to iTunes screen on your iphone. Now you can Release the Home Button. iTunes on your Computer should Detect the iphone in Recovery Mode. You could see something like below Picture on your PC.

      how to factory reset iphone without password

      Step 4: Basically what it says is to reset the Software to Factory standard. So Now go ahead and Click on Restore then Restore and Update. This will delete Everything from your phone so Caution there. Though to Factory Reset iphone without Password you can afford to loose data but will want to have access to your phone again right ?

      Step 5: iTunes will extract the software and you can see the progress bar as well. Now just sit back and relax and wait for the software to do all the Process for you.

      Step 6: Once extracting completes, You can see Apple logo on the screen it will then begin installing on your phone.

      Step 7: Once the phone is restored you can start all over again like how the phone comes out of the box when its new.It is safe now to remove the USB Cable. You will be asked to Select Language, Country/Region, Wifi password and few other things.

      You would be now able to Create new Passcode for your iphone without any trouble. So this is how you Factory Reset any iphone without password using iTunes. The method will delete everything from the phone but you will be now able to access it with entering the old password and creating the new one which you can remember easily this time.
      Let us know what do you thing about the steps mentioned above and if they are of any help in the comment box below.
      Droidadda is one of worlds best online blogging portal where latest trending articles on Android,Blogging,Seo,Gadgets,Tricks,etc are daily published.


      WiFi Hacking With KALI Nethunter

      NEW Blog / Shop about KALI Nethunter just started. You can find it here
      In the former articles we showed you how to hack different WiFi protocols. We broke WEP & WPS so far, since here we get the biggest chances of success. But being a WiFi Hacker isn’t an easy job when you have to run around with a Laptop! This articles shows you how to run Wifite on KALI Nethunter, a special edition of KALI Linux running on Android Phones and Tablets!

      Must Read : Kali Nethunter For Mediatek Devices MT6582 MT6592

      KALI Nethunter

      The Homebase of KALI Nethunter is, of course, at Offensive Security. The KALI Nethunter is completely free. No costs, no fees, just download it! You can find the Landing Page to KALI Nethunter right here

      KALI Nethunter, Wifi Hacking
      It now supports the Mediatek mobile devices.This has been one of the biggest build for Mediatek Development platform.

      Next, you need an Y-Adapter for your chosen hacking device. We want to do some serious Wifi Hacking. You will also find that one on Amazon:

      Y-Adapter Nexus
       
      Next, you need a powerful WiFi Adapter to conduct the WiFi Hacks. A must have for serious WiFi Hacking.

      List of Wifi Adapter For Android on Amazon

       Here’s the best model i have ever found:
       
      ALFA AWUS036H
       
      Basically now you are done.
      Next Steps:

      • Install KALI Nethunter on your Android
      • Use the Y-Adapter to plugin the ALFA WiFi Unit
      • Run Wifite to hack some WiFi Networks
      All information about how to hack the different WiFi Type you will find at this Blog. My tutorials cover:

       Video Tutorials:


      Final Words: 

      Before trying anything you have to recerch it once. As Kali NetHunter requires Linux Programming Skills. So you have to atleast know or  learn about linux programming in order to crack WiFi's. 
      Thank you for reading this post carefully !  
      Droidadda is one of worlds best online blogging portal where latest trending articles on Android,Blogging,Seo,Gadgets,Tricks,etc are daily published.


      We've seen the Google Assistant and Apple's Siri in action. They're probably the best voice assistant app for Android and iOS respectively. But are they really the best? This topic however will be reserve for another day.  If perhaps you've been using a Windows phone or Windows 10 PC then you'll be familiar with "Cortana". The app (Cortana) is Microsoft’s attempt to compete with "Apple’s Siri" and "Google Assistant" which actually seems as if there plans are slowly working considering how "Superior" and the number of Android users that have been using the Cortana voice assistant app.

      In a nutshell, Cortana is an intelligent personal assistant created by Microsoft to help better your life through voice commands. Cortana can set reminders, recognize natural voice without the requirement for keyboard input, and answer questions using information from the "Bing" search engine. Apart from this, Cortana can find opening-hours when on restaurant sites, show retail coupons for websites, sing a song, show weather information in the address bar, crack jokes, and get the latest popular sports games.Overall Cortana has a great sense of humor!.

      Install Cortana


      Cortana first made it's appearance on Windows 10 and was later made available on the Windows phones. Now Microsoft has officially released the Cortana app for Android on the Google Play Store. In the initial phase, they have decided to release Cortana for Android only on selected countries such as United States and the China region. But in a few days, it will be available on other countries. If perhaps you're the impatient type or if Cortana hasn't been made available on your region, then you can install the app from the Google Play Store by using this guide or rather download the app from a third-party source.

      Set It Up

      Once the Cortana app is installed on your Android phone, simply locate and open it from your device app drawer. The initial opening of "Cortana" will require you to agree to the apps term's and conditions, simply "Accept" this. Next you've to "sign in" to your Microsoft account, thus provide your email, phone number or Skype name followed by your password. If perhaps you don't have a Microsoft account, you'll want to create it from here. Now Cortana will prepare and then ask you to provide your name, enter the name of your choice and you'll be taken to the app homepage. If Cortana prompt you to enable your "Location", endeavor to do it.


      Use Cortana

      Cortana unravels a simple, customizable and yet full of information "Homepage" where all the "magic" will happen. The home section is where you can either type your queries or start a voice action. These commands can be seen at the bottom right corner of the page, you can type or use the microphone icon to perform any kind of voice command. For instance you ask Cortana "Who is the tallest woman on earth"? and she will try to understand and answer your questions to the best of its ability.


      Also one can easily ask Cortana to search for content, set reminders/alarms, place phone calls, send messages, show the weather, convert currency and more. Just tap the text or microphone icon to jump into action and perform this commands. Now look at Cortana main app interface, you will see relevant informations which includes contents like news, weather, local events, foods, finance, sports, travel and even more. This contents can all be controlled from the Cortana's "Notebook" section which we're going to dive into now.

      Notebook

      Cortana's "Notebook" idea is all about personalization, this is one thing you've to know about any human or intelligent assistant. Unlike the Google Assistant or rather Google Now, Cortana requires you to manually customize your experience in other for her (Cortana) to provide you with better information and know the kind of "Cards" you play. To access the "Notebook" section in Cortana, tap the "Profile" icon at the top-left corner of the screen, then "Notebook". Once here, you'll be presented with tons of options to customize the experience.


      First, select the "About me" option and change your name or nickname. Note that this can actually be whatever you like. Now when you scroll down from the Cortana's"Notebook" section, you'll be greeted with more options to customize their experience. If i where you, I'd go through all of them individually and set things up. This can actually cause alot of hassle but it will really help Cortana to get things started and provide you with the cards or information you love most. Even though customizing the experience seems tough, it's probably something i like.

      Settings

      From the "Profile" icon, you can also see the Cortana "Settings" options. This is probably what everyone loves as it allows you to customize the Cortana experience to the brim. Now in Cortana's Settings options, you can select or choose to Sync Notifications which is of essence when you want to see your phone Notifications on your PC. You can customize Cortana's color, change language & region, create shortcuts to Cortana app on your device home screen. The “Hey Cortana” option is not enabled for Android users, thus you can enable it from the app settings options and from then henceforth, you can say "Hey Cortana" to start a voice search from the Cortana app.


      Others

      Now from the Cortana main interface or rather homepage, once you tap on the "square dots" beside the microphone icon and text search, Cortana will unravel various options you might want to check out. Options such as reminders, weather, news, alarms and more. One unique things i discovered that Cortana can do is to "Sing a Song". Yep! She can probably use her nice voice to sing a melody that touches the soul. Apart from this, Cortana can crack funny jokes and thus making you laugh throughout the whole day.


      Final Words

      Guess we're through already! Cortana is the perfect alternative to the new Google assistant and perhaps to the Google Now also. The app provides advance features which the Google Now doesn't bring and moreover it's smooth as butter and very easy to use. Apart from the fact that the "Google Now" integrates with all the Google services on my android phone, I'd would've chosen Cortana to it. If perhaps you're using the non-pixel smartphone, then Cortana will probably be the perfect choice to the ever wanted "Google Assistant". There's no root access needed, there's no hassle. Simply use Cortana and discover how intelligent a personal assistant can be.
      Droidadda is one of worlds best online blogging portal where latest trending articles on Android,Blogging,Seo,Gadgets,Tricks,etc are daily published.

      Pixel Live Wallpapers

      When Google Launched his new Device Google Pixel at that time they wanted to be unique in every term. When the word comes to unique, then there is no concept copied from other manufacturers. Then no matters when it comes to its wallpapers.
      What’s the Real Story behind?
      There are many phones launched, but all are same. If Google is launching is their smartphone. Then it would be common it would be looking like the Nexus series.


      Must Look: Easy Steps to Get Google Pixel Experience with One Simple Mod

      Google recently launched Pixel Phone in which they came up with new and redesigned wallpapers in which amazing and HD Wallpapers were available for your device.
      Now, these wallpapers are called as Combine HD wallpapers. Why? Just because those wallpapers are combined with Google Earth high definition satellite images.
      The craze of these wallpapers is trending and when Google launched his phone. No one can believe that these amazing features will be coming up with the all new Google Pixel.
      These wallpapers are movable I mean when you will move your device even these wallpapers will be moving. This is one of the best features of these wallpapers.
      Google has come up with the entirely new concept and newly features of the application. The stunning and Glorious look of the wallpaper which will be making your device look good.

      Must Look: Google Pixel Experience For All Android Device


      Pixel Live Wallpapers

      Get the Pixel’s Amazing New ‘Live Earth’ Wallpapers on Your Android Device


      This Wallpaper Pack is ported by one of the XDA developers, and this wallpaper pack is working only with the arm64 devices only.
      This wallpaper pack is working in Android version 6.0 and 7.0x. But for now, it is working only in arm64 devices only. If in future it will be available for another device I will be surely updating this post.
      There is a small backlog of this guide that is if you have Android device running on arm then you can’t run arm64 application because of its architecture.
      Let’s get started with the guide of how to enjoy the Pixel’s Amazing New ‘Live Earth’ Wallpapers on Your Android Device.
      Also look: Latest GApps For Android Devices

      How to Check your Device Architecture?


      • Download and install Hardware Info application from  Play Store


      Pixel Live Wallpapers

      • Then click on Processor, and you will see your phone architecture.
        • Remember
          • Armv7 = Arm Device is supported now.

      How to Get the Pixel’s Amazing New ‘Live Earth’ Wallpapers on Your Android Device


      • Firstly Download and Install the Live Wallpaper on your android device  
       

        Pixel Live Wallpapers

        • Make sure that unknown sources are enabled on your device.

        Pixel Live Wallpapers

        • Now, install the application again in your device.

        Pixel Live Wallpapers

        • Now, hold on the screen and then you will get a change wallpaper option.

        • Select Live Wallpaper and modify the wallpaper according to your choice.

        Pixel Live Wallpapers

        Final Words:

        This way you can use the Pixel’s Amazing New ‘Live Earth’ Wallpapers on Your Android Device
        I hope you love this article. Thank you for visiting and share your favorite article with us.
        Share this article with your friends and keep visiting for more tips and tricks like this and I will meet you in the next one.