Articles by "Android Tricks"
Showing posts with label Android Tricks. Show all posts
Droidadda is one of worlds best online blogging portal where latest trending articles on Android,Blogging,Seo,Gadgets,Tricks,etc are daily published.

Hello Friends, i'm back again with a cool trick for the Vivo Android users. This time especially for Vivo V5/V5s and V7 users. So friends today i am going to explain you how you can unlock the bootloader on your Vivo V5/V5s/V7 devices. Yes you're right! i'm going to show you how it can be done.

As you know Vivo is very strict about their device security, hence not allowing any user to unlock the bootloader of their vivo smartphones and root them respectively. But don't be upset, i'm here today to show you the magic beyond unlocking the bootloader on Vivo smartphones.

Your warranty is now void.
* I am not responsible for bricked devices, dead SD cards,
* thermonuclear war, or you getting fired because the alarm app failed. Please
* do some research if you have any concerns about features included in this ROM
* before flashing it! YOU are choosing to make these modifications, and if
* you point the finger at me for messing up your device, I will laugh at you.

Requirements:

How To Unlock Bootloader?

Before you can start this process, please make sure that your vivo device has minimum 70% of battery remaining and is in running condition. So lets begin now :-

Step 1: Open Settings in your device and follow my words:
  • Click on More Settings
  • Now Clock on About Phone
  • Clock on Software version 7 times to enable the Developer option.
  • Press back and open Developer option and Enable OEM Unlock & USB Debugging.
  • Now Power off your device
  • Now Press Power+Volume Down button to enter into Fastboot mode
Note: You have to press volume UP button or Volume Down button after you enter Fastboot mode because the fastboot mode will exit after 2 minutes of inactivity. So be sure to active the fastboot mode by pressing volume buttons only. Do not press power button in fastboot mode.

Step 2: Now  install Minimal ADB Fastboot Drivers on your PC and follow my words:
  • Open Minimal ADB Drivers and Type the following commands on the command prompt
1. fastboot devices
(This command will show the devices connected to the fastboot mode.)

2. fastboot getvar all
(This command will show you a detailed info on your bootloader state.)

3. fastboot oem unlock
(This command will promt bootloader unlock request on your device)

Step 3: Now check your device there will be a prompt request upon bootloader unlock on the fastboot mode. Here you will have two options to press: Volume UP & Volume Down
  • Pressing Volume UP will confirm the request coming from ADB and unlock the Bootloader of your device.
  • Pressing Volume Down will cancel all the request and terminate the unlocking process.
Step 4: Now again check whether the Bootloader has really been unlocked or not. For this you have to type the following command again in your command prompt:
  • fastboot getvar all 
Note: If you followed all the process correctly the output of above command will show Bootloader Unlocked state as "Yes".

So congratulations! you've successfully unlocked the bootloader on your Vivo smartphones.

Watch The Video Carefully


Final Words

So this was the article on How To Unlock Bootloader on Vivo V5s (100% Working Proof Added). Now you have known all the facts about this article clearly. I hope you love this article.

Share this article with your friends and do let them know about this amazing article and I hope they will love it and love to install it on their device. Thank you for visiting Droidadda and keep visiting for more tips and tricks like this and I will meet you in the next article. Till then stay peace.
Droidadda is one of worlds best online blogging portal where latest trending articles on Android,Blogging,Seo,Gadgets,Tricks,etc are daily published.
WhatsApp is the biggest messaging application which helps us to chat with our friends, family and our relatives. Nowadays many of them are searching for an app to decrypt the data of WhatsApp. They can know what they are doing exactly. We won’t be sharing the way to spy on your friends but we will tell you the way to create fake WhatsApp conversation on your Android.

If you are interested in creating the fake conversation and prank your friends then you can download an application which is called as WhatsFake. Download this application from Play store and it will help you to create your own fake conversation of WhatsApp.

WhatsFake is having the same user interface as that of WhatsApp which will help you to create the fake conversation with your friends and amazing play store ratings. You can send the new emoji and create the fake conversation anytime you want and it is totally free.

Fake Whatsapp conversation for Android 2017

    Create Fake WhatsApp Conversation on Android

    You can easily create fake WhatsApp conversation. There are the shortcut keys to take the screenshot of the chats and they will be shocked. You can change the status of the text message and set the last seen also add the profile picture to any chat and change the author of the message.

    Also Read: How To Send Large Files on WhatsApp (Above 1GB)
    When you will create the fake WhatsApp conversation you don’t need a rooted device. There are some ads in the application but in the main conversation screen you won’t find any ads and this is the most important part of creating a fake conversation of WhatsApp.
    There are a number of apps which help you to create the fake WhatsApp conversation but they are not working anymore just because of too many bugs and they are not maintained and updated anymore.
    Note: This Application Is Just For Fun Purpose Only

    How to Create Fake WhatsApp Conversation on Android

    • Download WhatsFake application from here: Play Store.
    • Open the application and Green floating button to create the fake conversation.
    Fake Whatsapp Conversation for Android 2017
    • Click on the Contact Name and change the details and last seen of that message.
    Fake Whatsapp conversation for Android 2017
    • That’s it! Click the back button and save the details. If you need you can also apply the profile picture.
    • Whenever you will write the message you will get an option. You can select it and choose whether it is receiver message or sender.
    Fake Whatsapp conversation for Android 2017
    • Take a screenshot and send it to your friends.

    Hidden Features

    • Change content of Message
    • Change Receiving Time of Message
    • Read All Messages without appearing online on WhatsApp
    Pros
    • You can easily modify the Messages without any issues
    • Simple User interface
    • Read all the messages without appearing online on WhatsApp
    • You can also change the chats of groups
    Cons
    • Requires Root Access
    • Sometimes this application crashes

    Minumum Requirements

    • Official WhatsApp – WhatsApp Download
    • WhatsHack Application – Download
    • Make sure that you have backed up the data of WhatsApp
    • Rooted Android mobile phone – Root Your Android Mobile Easily Without PC [Updated]

    How To Modify WhatsApp Messages Using WhatsHack

    • Make sure that you have completed all the above requirements before proceeding to next step
    • You have to back up your WhatsApp chats by going into Settings > Chats and Calls > Backup Chats
    • Now After backing up WhatsApp chats open the WhatsHack application and Press at the logo to allow root access in your device
    Fake Whatsapp conversation for Android 2017
    • After allowing the root access you will see several chats available on the application.
    Fake Whatsapp conversation for Android 2017
    • Now, Open the chat conversation whichever you want to modify it
    Fake Whatsapp conversation for Android 2017
    • After that click on chat of the person and click on Modify. If you want to modify the group you can also do that easily by clicking on group
    Fake Whatsapp conversation for Android 2017
    • After modifying it close the WhatsHack application and check the chats of yours and you can easily send him screenshots of the chats.
    Fake Whatsapp conversation for Android 2017

    Working Proof

    • Original Chat Conversation:
    Fake Whatsapp conversation for Android 2017
    • Chat Conversation After Modification via WhatsHack:
    Fake Whatsapp conversation for Android 2017

    Trouble-shooting

    • Whenever WhatsHack crash try clearing the data of WhatsHack and try again
    • Getting error in assessing chat database make sure you have back up the data and then try again

    Final Words

    This was the tutorial on Whatsapp Fake Chat Conversation. I hope you'll like this tutorial. If you need any extra help completing this guide, then you should tell me in comments. If installation fails, then the only thing that you need to do is to try and repeat the whole tutorial more than once.
    Also Read: How To Chat With Anyone on WhatsApp Without Saving Number


    Thankyou for visiting Droidadda. For fast access to our service Bookmark & Subscribe us now. Share this article with your friends and show how they can customize WhatsApp. If any issues then feel free to comment below. Peace out.
    Droidadda is one of worlds best online blogging portal where latest trending articles on Android,Blogging,Seo,Gadgets,Tricks,etc are daily published.
    How to Root One Plus 5

    As we all knew One Plus 5 has been released in iIndia on 22nd June @Amazon, Flipkart, etc. It is the latest Flagship smartphone of One Plus. This device has scored awesome points on Benchmarks. OnePlus 5 is the most amazing smartphone which you can use it right now. OnePlus 5 was launched on June 20 and the XDA Senior Member Xdvs23 came up with stable enough TWRP recovery for the OnePlus 5 which you can enjoy it right now. In this article, we are going to tell you the way you can Root Your OnePlus 5 and Install TWRP Recovery quickly on your phone.

    Also Read: Moto G5 Plus: How to Unlock Bootloader | Flash TWRP | Root

    The OnePlus 5 which was recently launched and at a great price tag. We have seen a lot of users buying the OnePlus 5 and also finding the way to root. There are a lot of users who find rooting very essential and enjoy doing it. Rooting gives us the freedom to install any application and try something outside of a box.

      If you don’t know anything about rooting, let us explain you in short. Rooting helps you to install any application on your device, and you can try killer tricks after rooting your smartphone. You can do changes on your system files and much more. If you are rooting your device for the first time, then it requires three steps which are important and if you pass all these steps then you can easily root your device without any issues. Let’s get started i'll help you out.


      3 Most Important Proceedure of Rooting? 

      1. Unlocking Bootloader: If you want to start rooting your device then the most important is unlocking the bootloader. If you unlock the bootloader, it will allow you to root your device and also flash the custom ROM. Unlocking the bootloader will wipe your device.

      2. Install TWRP Recovery: If you want to flash anything such as custom ROM or root your device, then TWRP recovery is the most important. If you want to root your device with the help of magisk, then you can do so with the support of TWRP recovery.

      3. Rooting: If you have root then you can install any application on your device which requires root. You can easily uninstall the system application. If you want to proceed to root your device then the most important is TWRP recovery.


      If you are done with these three important files and command, then you can easily root your Android device.

      Rooting Requirements: 

      How to Root Your OnePlus 5 and Install TWRP Recovery 

      If you want to root your Android device, then make sure that you follow all these steps before proceeding to next step. Rooting is the easy process only if you follow all these steps carefully and accurately. If you stuck at any steps, then feel free to comment below, and we will surely help you out.
      Step 1: Enable ‘OEM Unlocking’ & Reboot to Bootloader Mode
      I have already mentioned above that the unlocking bootloader is the most important step to begin with rooting if you won’t enable the OEM unlocking then it is of no use. Let’s see the way to enable it.
      • Go to “Settings & About” now there you will see an option of ‘Build Number’ tap on that option 5 times and now the developer option is enabled. 
      • Go back and click on the “Developer Option.” Now, toggle on “OEM Unlocking” and “USB Debugging.“
      • If you have done this, then you need to boot your OnePlus 5 into  fastboot mode . 
      • Power off your device and wait till it gets completely shut down. 
      • Press the “Power Key + Volume up Key” for around 10 seconds, and you will see the fastboot screen, and there will be text ‘Fastboot.’ 
      Step 2: Unlock Your Bootloader Mode 
      Now, you that have entered in the fastboot mode, so you need the Minimal ADB drivers then make sure you have all the ADB files on your PC and then move to the next step. 
      • Connect your device to the PC and move to the next step. 
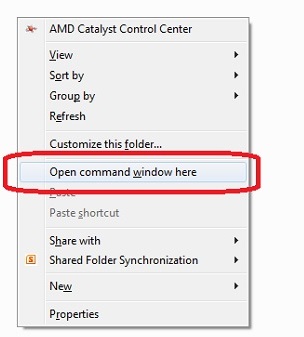
      • Open the ADB drivers folder and press the “Shift button + Mouse right click” and then click on Open Command Window here. 
      • Then type the below command to check if everything is working fine. 
      >>  fastboot devices  <<
      • Now, this command will show the serial number of your device. If it shows the serial device correctly, then you have properly installed the files on your device. 
      • If you want to unlock the bootloader of OnePlus 5, then type the below command. 
      >>  fastboot oem unlock  <<
      • Your bootloader will be unlocked now. 
      Also Read: How to Unlock Bootloader in Xiaomi Smartphones
        Step 3: Install TWRP Recovery in OnePlus 5
        • Download the TWRP recovery for your device we have added all the necessary files in the OnePlus5 master.zip file. 
        • In the command window type the below command.
        >>  fastboot flash recovery twrp-3.1.1-0-oneplus5.img  <<

        • That’s it! Now, boot your device into the twrp recovery by entering the below command. 
        >>  fastboot boot twrp-3.1.1-0-oneplus5.img  <<

        • The next step it will ask you to allow the modification of the system files. Just swipe the slider and click on never show this screen on boot. 
        • That’s it! You have successfully flashed the TWRP recovery on your device and its time to root your device. 
        Step 4: How to Root OnePlus 5
        • Download the SuperSU on your device and move the files to your internal storage. 
        • Boot your device into the recovery mode and click on the “Install” button and then search for the SuperSU zip file. 
        • Click on file and move the slider and that’s it! You have successfully flashed the SuperSU on your device. 
        • Reboot your device, and you will the SuperSU installed on your device. 
        If you want to pass the SafetyNet, then you can install the Magisk Manager on your device, and it will help you to pass the SafetyNet on your OnePlus 5. 

        Keep in mind that the first boot will take around ten mins. You need to have patience and wait for it. You can download the Root Checker application to find if the device is rooted. 

        Video Tutorial:

        Final Words

        So this way you can easily install the TWRP recovery and root your OnePlus 5. You may also like How to Unlock Bootloader in Moto E3 (100% Working)

        I hope you understand and if you have any issues in rooting or following this guide feel free to comment below. Share this article with your friends who are having the OnePlus 5, and I hope they will love this guide. You can now install the custom ROM on your device. 
        Thank you for visiting Droidadda and keep visiting for more tips and tricks like this, and I will meet you in the next one.
        Droidadda is one of worlds best online blogging portal where latest trending articles on Android,Blogging,Seo,Gadgets,Tricks,etc are daily published.

        Today Google Pixel and LineageOS, both of them, are trending in XDA forums and people are flashing these ROM. Now, the developer Subin Mani worked hard to provide the flashable zip files which will help you to Flash Pixel Blue Theme & Animated Navbar On LineageOS.

        Also Look: Easy Steps to Get Google Pixel Experience with One Simple Mod
        LineageOS is nowadays coming up on many Android devices, and you can also enjoy the latest version of Lineage by downloading from the list we have mention it. If you have any AOSP Based ROM, then you might have seen that there is a green color theme and in pixel, you will check that there is a blue color theme and it looks great.

        Flashing the blue color theme is easy, and if you are having the LineageOS installed on your phone, then it will be very easy for you to flash the pixel theme and the animated navbar on your phone. This was something new which was launched in the all new pixel devices.
        Also look: How to Port Google Pixel Round Icons To Your Android Device

        Flash Pixel Blue Theme & Animated Navbar On LineageOS

        This is the flashable zip file which is having the feature of Google pixel, and this flashable file has the patched SystemUI.apk. This feature is only available for devices running the latest LineageOS.
        If you want to flash the files, then you can quickly flash it with the help of small zip files and you will need a TWRP recovery installed on your phone and with the help of that zip file you can enjoy the pixel experience.
        If you don’t know to flash the zip files on your phone, then you can just use the application such as Flashify or FlashFire to install it on your phone. This will make it easy for you to flash those zip files on your phone. Let’s get started how you can flash the files on your phone.
        Also look: How To Get Google Pixel Theme Experience on Your Android

        Requirements

        • LineageOS 14.1 (18/April/2017) update
        • Custom Recovery installed such as CWM, Philz, CTR and TWRP
        • Rooted Android device

        Features

        • Animated Nav Button
        • Pixel Luncher
        • Google Phone
        • Google Contact
        • Google Assistant
        • Pixel Logo And Boot Animation
        • Blue Accent
        • Pixel Ringtone
        • Pixel Round Icon
        • Night Light
        • Pixel Wallpaper
        • Updated On:

        Android 7.1.2 LineageOS Build: 30/May/2017

        Downloads and devices:

          Phone

           Download
        Moto G Falcon Download

        Moto G4 Plus

        Download

        OnePlus One

        Download

        Moto E Condor

        Download

        Moto G 2015

        Download

        Nexus 5

        Download

        Moto G2 Titan

        Download

        OnePlus 3

        Download

        Moto G Turbo

        Download

        Flash Pixel Blue Theme & Animated Navbar On LineageOS

        • Download the file for your device from the above given list and save it to your internal SD card.
        • Now, switch off your phone and boot your phone into recovery.
        • Click on the Backup button, and the backup process will be started.
        • After backing up, the data click on the install button and search for the zip file in your internal or your external storage.
        • Then just click on that file and then swipe it to the right and the installation process will be started on your phone.
        • Then reboot your phone Flash Pixel Blue Theme & Animated Navbar On LineageOS will be installed on your phone.

        Final Words

        This way you can directly Flash Pixel Blue Theme & Animated Navbar On LineageOS. You can flash these files only if you are having LineageOS.
        Also Read: How To Get Google Pixel Live Wallpaper Effect on Your Android
        We will make sure that we will be updating these zip files and share this article with your friends and we will be adding the new devices soon so make sure that you bookmark this atricle link on your browser.
        Thank you for visiting Droidadda and keep visiting for more tips and tricks like this and I will meet you in the next one with some more features of Android O. If you have any issues then please feel free to comment below and I will surely help you out.
        Droidadda is one of worlds best online blogging portal where latest trending articles on Android,Blogging,Seo,Gadgets,Tricks,etc are daily published.

        As we all knew, Android O is the latest version of the Android which will be coming soon in the month of August or September on some of the leading smartphones. Android O Developer Preview 2 came with the new features in which one of the feature was the notification dots. Whenever you receive any notification, you will see a dot on the screen. If you have Nexus, Pixel or any other smartphone, then you need to wait for some months for this feature. Today, I will tell you the way you can enable Android O notification dots on any Android device.

        Also look: How to Install Android O Emoji on Any Android Device

        We have seen the feature of notification badges in the devices such as Samsung. Today, I will tell you the way you can get this feature on any Android device but this will be totally different.
        You might have used the launchers on any device. Today, I will show you the way you can enable those feature with the help of the Nova Launcher which will help you to enable the Android O notification dots on your device.

          What is Nova Launcher?

          Nova Launcher is the application which helps you to change the look and feel of your Android device. Suppose if you have Android Jellybean, and you need to enjoy the look and feel of Android Nougat then you can do the customization in your launcher and enjoy Android N features.
          Also Look: How to Install Android O Theme on Your Any Android Device

          Now, the new Beta version of the Nova launcher is up, and you can enjoy the notification dots on your device too if you enroll yourself to the beta version of the nova launcher.
          Recently, Cliff Wade from TeslaCoil posted a changelog on XDA and came up with the new features in the latest beta of Nova Launcher.

          Changelogs:
          • Dots! Android O style notification badges.
          • Round search bar style.
          • Performance improvements.
          • Minor fixes for Android O.

          Enable Android O Notification Dots on Any Android Device

          We have seen the Samsung earlier devices was having the feature of notification badges. We have seen stock Android never came up with the feature of notification badges. Now, Android O is coming with notification badges.
          If you want to enjoy the notification dots on your Android device, then you need to pay 4.99$ to buy the Nova Launcher Prime. This feature is still available for the beta users. If you want to enjoy this feature on your device, then you need to enroll yourself to the beta version and buy the software.
          Also look: How to Enable Android O Boot Animation on Any Android Device
          Personally, I don’t like the notification badges just because it keeps on showing us the number of how many messages you have got. I love the new feature which is coming in Android O, and you can use this feature on your device too with the help of Nova Launcher.

          How to Enable Android O Notification Dots on Any Android Device

          • Download and install the Nova Launcher Prime on your device from below link.
          • Now, enroll yourself to the beta version of the Nova Launcher from below link. Click on Become A Tester, and after 15 minutes you will receive the update of the new beta version.

          • Now, you can wait for 15 minutes for the beta version of Nova Launcher, or you can simply download the Nova Launcher from below link.
          • Go to Nova Launcher Settings and there you will see “Notification Badges” click on it.


          • You will see an option of the “Dots” Tap on it, and you can customize the Dot feature.
          • Now, whenever you receive any notification then you will see a Dot on the application.

          Video Tutorial


          Final Words

          This way you can enable Android O notification dots on any Android device. I hope you love this article. If you hold on the application, it won’t show the notification or message yet. You need to wait for some days, or you can also install the Android O Developer Preview 2 Pixel Launcher on your Android device.
          If you love this Launcher then I will suggest you to buy this launcher and enjoy the latest beta version of nova launcher and there are many features of this launcher.
          Share this article with your friends and do let them know about this amazing feature of this launcher. I hope they will love this article.
          Thank you for visiting Droidadda and keep visiting for more tips and tricks like this and I will meet you in the next one with some more features of Android O. If you have any issues then please feel free to comment below and I will surely help you out.
          Droidadda is one of worlds best online blogging portal where latest trending articles on Android,Blogging,Seo,Gadgets,Tricks,etc are daily published.

          Hello Fellas! Welcome back to Droidadda. Today you'll learn an amazing method to unlock Bootloader in your Xiaomi Devices. In this tutorial, we will be able to show you find out how to unlock Bootloader of Xiaomi telephones utilizing Mi flash software which is formally furnished with the aid of Xiaomi.

          The rage of Xiaomi merchandise is increasing day-to-day globally. After the colossal success of Xiaomi Redmi observe three. They are increasing their market globally with modern-day and innovative merchandise.
          Xiaomi telephones are widespread in all places the arena considering of their high-quality Specification, efficiency, first-rate Builds & their pricing. Also, the essential rationale for the repute is MIUI OS which is very customizable and consumer-pleasant.

          Now Xiaomi contraptions come with locked bootloaders due to security reasons. Further, on this put up, we will speak about this. From onwards all xiaomi phones will come with a locked bootloader
          And to liberate the bootloader, We need to comply with some steps with Xiaomi’s Permission. We have got to apply for bootloader release permissions first after granting this we will unlock bootloader with the aid of utilizing Mi Flash release tool.

          Xiaomi develops this software for this unlocking approach. So, Let’s get began now?

            Why Is Xiaomi Locking Bootloader?

            It’s the primary question comes in our mind. Why is Xiaomi doing that? They are doing this as a result of protection factors. They wanted to make sure the safety to the device in case your gadget will get lost or stolen by any person.

            With locked bootloader that person can't flash customized ROMs to use your gadget, Even he can't boot to inventory recuperation for manufacturing unit data reset. For this predominant motive, Xiaomi is locking bootloaders of their upcoming telephones.

            What is Bootloader Unlocking?

            It's a procedure of unlocking bootloader through which which you could make changes in your Android device. With the aid of unlocking your bootloader allows you to flash customized ROMs, install customized Recoveries or supply root entry, etc.

            For Xiaomi mobile that you could liberate bootloaders via Mi Flash liberate Toolkit. This procedure successfully works on the gadgets like Xiaomi Redmi note three, Xiaomi Redmi be aware 4, Xiaomi Mi 4C, Mi observe pro, Mi 4S, Mi 5, Redmi three, Xiaomi Mi 5C & Upcoming Smartphones.
            Comply with this consultant to free up bootloader of Xiaomi telephones.

            Essential Notes:

            Unlocking of bootloader will lose your guarantee.
            We are not responsible for any damage.
            This process is for Xiaomi telephones best. Do not try this procedure on another phones.

            Requirments:

            • Make sure that you have carried out a full backup of your device to hinder information loss for the period of unlock system.
            • Install Xiaomi USB Drivers in your laptop.
            • Permit USB Debugging in your Xiaomi telephones.
            • Additionally, make certain that you're on professional MIUI ROM for unlocking procedure.

            The best way to liberate Bootloader of Xioami phones

            The bootloader unlocking process divides into two steps. First one is you need to Request for unencumber Permissions after which bootloader unlocking procedure by means of fastboot mode.

            1. Inquiring for For free up Permissions

            • The first step is open this URL to apply for unencumber permissions. Go to unlock Request web page. Press unlock Now button.
            • On the subsequent page, you have got to log in along with your Mi Account. If you happen to don’t have Mi account, then please create a brand new one however make certain that you just log in with the identical account on the device and Mi Flash release tool.
            • After sign in you must fill the shape with the correct rationale to unlock your gadget. Which you can select any rationale like follows.
            • My gadget is stuck at logo.
            • My Xiaomi mobilephone is rebooting once more & once more.
            • You could choose any other reason
            • Enter your title.
            • Select nation.
            • Enter your mobile quantity.
            • Now, Write a appropriate rationale for bootloader unlocking. Do not replica and paste from at any place else.
            • Fill Captcha code.
            • Be given the Disclaimer.
            • At final, press observe Now button.
            • In next web page, you have to conclude cellular verification. Enter the code that you've acquired on your mobile & Press subsequent. If you didn’t receive then use Resend Button to get your verification code.
            • After triumphant mobile Verification you are going to be redirected to a web page pronouncing that utility has been effectively submitted, Please be a patient review.
            All you have got to do is watch for few days you're going to get approval notification to your cellular by means of SMS. It is going to take more than ten days so be sufferer.


            All you ought to do is wait for few days you will get approval notification to your cellular by means of SMS. It should take more than ten days so be patient.
            It'll take greater than ten days so be patient!

            After getting SMS subsequent step is to unencumber bootloader by way of using Xiaomi Mi Flash software.

            2. Bootloader UnEncumber approach With Mi Flash software

            Requirements for Unlocking system:

            • Download Mi Flash Unlock Tool first.
            • Ensure that USB Debugging is enabled to your gadget. If not then go to Settings > About mobilephone tap on MIUI version 7-eight instances once more go to Settings > extra Settings > Developer choices permit USB Debugging from this choice. Additionally, permit OEM release from this settings.
            • Install suitable USB Drivers of your Xiaomi cell. (download Xiaomi USB Driver)
            • Backup your data to avoid knowledge loss.
            • Login your Mi Account.

            Steps to UnEncumber Xiaomi phones Bootloader:

            • Download & Extract Mi Flash free up software on your pc. After extraction run this program.
            • After Opening a Pop up will appear asking to be given Disclaimer. Click on Agree button for subsequent.
            • Now you ought to signal on your Mi Account with this instrument. Signal in with the same account that you just had a use for Unlocking Request and logged in your present gadget which you wish to have to free up.
            • Four. Join your gadget with USB to laptop in fastboot Mode. To connect your gadget in fastboot mode, change off your device & use power On + quantity Down button in addition into fastboot mode.
            • Press liberate button in Mi Flash unlock tool. This procedure will take 2-three Minutes to complete Unlocking of your device.

            • After effectually Unlocking your gadget Press Reboot to  your mobile almost always. After unlocking your bootloader, you’re competent to Root your device, Flash custom or Fastboot ROMS, install customized restoration, and so on.

            Learn how to ReLock Bootloader After Unlocking?

            After unlocking which you could relock your bootloader via handiest flashing professional MIUI ROMs. My recommendation is to used reliable MIUI ROMs. A variety of custom ROMs having bugs of their procedure.

            F.A.Q About Unlocking Bootloader

            1) Which devices are locked & can be unlocked making use of Mi Flash release software?
            Ans: The gadget like Mi 4C, Redmi word 3, Redmi notice four, Mi observe professional, Mi 4S, Mi 5, Redmi 3, Xiaomi Mi 5C & Future telephones in order to include the locked bootloader can be unlocked utilising this tool.

            2) What will change after Bootloader Unlocking?

            • Unlocking bootloader may just intent some data loss.
            • Natural OTA Updates is probably not affected.
            • Healing mode will alternate updating through healing will want Mi pc Suite.
            • Some feature would possibly not work but don’t fear about that.
            • Three) Xiaomi will not be approving my unlocking request?
            Reply: If it takes more than 15 days, then which you could reapply for unlocking request or Go to MIUI forum and put up your question there.
            Other Un-legitimate methods are additionally on hand for unlocking bootloader with out permissions you could try them also.

            3) Am i able to entry recuperation after unlocking bootloader?
            Ans: No. You can not access inventory Mi healing however you could flash customized recoveries like TWRP or CWM restoration and might entry them.

            4) Going through “present account is one-of-a-kind from the account info on the gadget” error?
            Ans: Be certain that you have used the equal account for unlocking request and logged in with the equal account on that device. Additionally, for those who nonetheless dealing with this error are trying again after few days.

            Final Words

            Unlocking bootloaders of Xiaomi instruments shouldn't be a difficult project. However handiest release them if you recognize about custom ROMs, Root, Recoveries, etc.
            For those who do with out knowing something could intent a significant limitation like bricking your device, shedding your fundamental information, and so forth.

            Droidadda is one of worlds best online blogging portal where latest trending articles on Android,Blogging,Seo,Gadgets,Tricks,etc are daily published.


            How to Root Moto E3 Power [100% Working]

            Hello, guys! In my busy schedule, I am back with another root tutorial. Recently Lenovo owned Moto has launched a nice phone for power user, Moto E3 Power having a great battery. Today I am going to show you how to root Moto E3 Power. As like other android device rooting Moto E3 is quite similar but you need to be careful. Rooting android device is always an experimental process. So do at your own risk. Here I am showing you the roadmap of rooting Moto E3 Power.
            Moto E3 Power is one of the best budget android devices available in India. The price tag of the device makes it a worthy competitor for many. When it comes to the specifications, The device boasts a 5″ 720P HD display coupled with a MediaTek Quadcore process & 2 Gigs of Ram. If you are a camera buff then the device sports a 8 MP back and 5 MP front cameras. The device runs Android 6.0.1 and should get the Nougat update anytime soon. You can unlock Moto E3 Power bootloader before rooting it.
            As we have discussed in the recent article on “Everything you need to know about rooting and unlocking Moto E3 Power“. If you missed this article go and check it out. Unlocking your device’s bootloader is the initial step of rooting Moto E3 Power. In order to unlock Bootloader of Moto E3 Power, you need to first root Moto E3 Power.
            When it comes to Moto devices, they are pretty straight forward with the process of bootloader unlocking. If you wish to unlock Bootloader of Moto E3 Power, then there are official guides itself to help you. Moto encourages developers so that you won’t find it hard to find guides. So if you are thinking to root Moto E3 Power then Unlock Bootloader of Moto E3 Power by following our guide.
             

            root moto e3 power
            Disclaimer: By attempting any of the processes listed in this thread you accept full responsibility for your actions. I will not be held responsible if your device stops working, catches fire, or turns into a hipster and claims to have been modified before it was cool.

            How To Root Moto E3 Power [100% Working]

            Method 1:

            NOTE: Backup all your files like photos, video, mp3 including contacts, SMS etc to your computer as unlocking the Moto E3 Power Bootloader will completely wipe/delete all files on the device.

            A. Download these tools

            Download Motorola Driver

            B. Enable USB debugging and OEM Unlocking

            1. Go to Settings > About phone, and then tap ‘Build number’ 7 times or until you get the message ‘You’re now a developer!’.
            2. Go back to Settings, choose ‘Developer options’. Find the ‘USB debugging’ option and enable it.
            3.  In the ‘Developer Option’ you will also find the ‘OEM Unlocking’ option, just enable it. It will ask for your PIN/Screen unlock code to enable it.

            C. File preparation

            1. Right click on ADB FASTBOOT FILES.zip and select Extract to “ADB FASTBOOT FILES” folder
            2. Rename the TWRP_3.0.2.2-moto_E3_power.img into twrp.img
            3. Now put the twrp.img file in ADB FASTBOOT FILES folder.

            D. Driver Installation

            Install Universal Windows ADB Driver on your PC, then install Motorola Driver and restart your PC.

            E.  Install TWRP Recovery and Root Moto E3 Power

            1. Connect your phone to your PC via USB cable
            2. Once you connect to PC, you will get a pop up on your Moto E3 Power
            3. Just tick the “Always allow from this computer ” check box and tap OK
            4. Open the “ADB FASTBOOT FILES” folder in your PC
            5. Inside the folder, hold “Shift” Key then right click and select “Open command Windows hereroot-lenovo-k3_1
            6. Now type this bellow command
              adb devices
            7. Now you will be able to see your device. Mean driver installed properly
            8. Now disconnect your Moto E3 Power from PC, don’t close the command prompt.
            9. Power off your device, then press the power and volume up buttons simultaneously
            10. It will come into boot menu
            11. Use volume down key to go into fastboot mode
            12. Now connect your phone to PC via USB
            13. Now execute this command
              fastboot oem unlock
            14. once it down you need to execute this command
              fastboot format userdata
            15. Now restart your phone, while restarting you will see that “device unlocked”
            16. Copy and paste the SR3-SuperSU-v2.78-SR3-20161103171345.zip into internal memory of phone
            17. Power off your device, then press the power and volume up buttons simultaneously
            18. It will come into boot menu
            19. Use volume down key to go into fastboot mode
            20. Now connect your phone to PC via USB
            21. Type this command and hit enter, just make sure twrp.img file is in ADB FASTBOOT folder
              fastboot flash recovery twrp.img
            22. It will return to finish once the flashing process complete
            23. Go to boot menu by pressing Power+ Volume Up Key then navigate to “RECOVERY MODE”
            24. You will see TWRP recovery mode.
            25. Now make a backup of your current ROM in external sd card, If you don’t know how to backup ROM via TWRP then Google it!
            26. Now tap on Install then browse and select SR3-SuperSU-v2.78-SR3-20161103171345.zip (If you put in external then browse external)
            27. Swipe to confirm the flash
            28. Once done do Wipe Dalvik & Cache then tap on Reboot System To Restart
            29. Your Moto E3 Power is now rooted.
            30. To check whether Moto E3 Power has root access or not, just go to Google Play Store and install Root Checker and run it.
            Hope you have understood this guide, so go and Root Moto E3 Power. In case, any confusion or problem regarding Root Moto E3 Power just comments here. If you got success to Root Moto E3 Power then also comment here, it will help other users!!

            Method 2: 

            how to unlock bootloader of moto e3 power

            Prerequisites to Unlock Bootloader of Moto E3 Power:

            There are few prerequisites to unlock bootloader of Moto E3 Power and make sure to check them out. We advise you to go through all the prerequisites to save yourself from trouble while you try to unlock Bootloader of Moto E3 Power.
            1. Make sure that you have enough charging (70%+) on your device. (Buy Power Banks for Moto E3 Power at cheaper rates)
            2. Backup all important data on your device as unlocking Bootloader of Moto E3 Power as you’ll lose it.
            3. Enable “Developer Options” on your device. (Check below to know how to enable developer options)
            4. Navigate to Settings >> Developer Options >> enable “USB Debugging”.
            5. Next, enable “OEM Unlock” to unlock your bootloader.
            Unlock Bootloader of Moto E3 Power

            1. Download Moto E3 ADB drivers here.

            How to Enable Developer Options on Moto E3 Power

            Developer Options is a hidden feature of Android devices which can be enabled to unlock Bootloader of Moto E3 Power. Developer Options contain a number of features which aren’t available to normal users. So if you are finding it hard to enable developer options on Moto E3 Power then follow below steps.
            1. Unlock your device and navigate to “Settings”.
            2. Navigate to “About Phone”.
            3. Now tap on build number 7 times.
            bootloader unlocking in Moto E3 Power


            Enable Developer Options in Moto E3 Power
            That’s it you have successfully enabled Developer Options on Moto E3 Power. Now you can find “Developer Options” in the settings itself. Now let’s dive into our guide on “How to Unlock Moto E3 Power Bootloader”.
            If you have read the prerequisites then you can unlock the bootloader of Moto E3 Power. So let’s see the steps to unlock Moto E3 Bootloader.

            Procedure to Unlock Moto E3 Power Bootloader:

            1. Unzip the adb which you have downloaded earlier.
            2. Make sure you have Moto E3 Power drivers installed on your device. Connect your device to the computer.
            3. Now navigate to the unzipped folder and hold Shift + right click & select “Open CMD here”.
            4. In the command windows, type in “adb devices” which will show the list of connected devices.
            5. Next type in "adb reboot bootloader", which will reboot the device to bootloader.
            6. Now type in another command "fastboot oem get_unlock_data" which will look like the below pic.
            7. You will get a string of text, copy & paste it in notepad and make sure to delete empty spaces.
            8. Go to Motorola site to unlock Bootloader and create an account if you don’t have one.
            9. Now you need to paste the text you copied earlier and click on “Can my device be unlocked?”
            10. You will get an unlock key on your registered email id.
            11. Next, you need to copy the unlock key and type in "fastboot oem unlock "
            12. This will unlock the bootloader of Moto E3 Power.
            13. Reboot Moto E3 Power and you are good to go.
            That’s it you have successfully unlocked Moto E3 Bootloader. If you have any queries regarding the how to unlock Bootloader of Moto E3 Power then do leave a comment below. Make sure to bookmark our site to get latest Moto E3 Power Updates.

            Also Read: How To Easily Unblock Bootloader on Moto G5 (Best Way)