Articles by "Tweeks"
Showing posts with label Tweeks. Show all posts
Droidadda is one of worlds best online blogging portal where latest trending articles on Android,Blogging,Seo,Gadgets,Tricks,etc are daily published.

There are many hidden features available in official WhatsApp application. But to turn on those options you need to do editing in shared pref folder in your WhatsApp application root directory.
Now, there are several codes to turn every option in WhatsApp instead you can use WA Tweak application to enable those feature and the code will be automatically written in that file. You don’t need to do anything.

This application is off just 4 MB and it is having various features in which you can install new emoji in your WhatsApp application. There are some bugs in this application but in future release, those bugs will be solved soon.
WA Tweak only customize and edits your Official WhatsApp. If you want to edit GBWhatsApp then you can’t do it. There is an inbuilt package of WhatsApp is fit in WhatsApp.

    What is Chmod?

    There is explicit permission given to the applications. About the application features which should be hidden or which features should be shown to the users.
    Now, whenever WhatsApp receives the beta update at that time some specific permission are hidden and to unlock those feature WA tweaks application is used to unlock those hidden features.
    Chmod777 permission is used to unlock those settings in WhatsApp. You can enable those features using ApkTool to decompile the WhatsApp and then you can change the permission of the application.

    What is WA Tweaks?

    WA Tweaks is the Android application which will help you to unlock the hidden feature of WhatsApp and then you can check the newly added features. There is a different tricks available to unlock those feature of WhatsApp which is different from other application, and you need to force stop this application. The developer of WA Tweaks regularly checks the WhatsApp and see to it that is there any new feature available in WhatsApp? If yes then the application is updated.

    This application is updated daily you can bookmark our site to receive the regular updates it is simple and easy. The size of the application is just 4 MB and which can do a lot of tweaks with the WhatsApp and it works in the rooted Android device. This application is only supported in official WhatsApp this application is not supported by any other mods such as GBWhatsApp, WhatsApp prime or WhatsApp Plus which is having the different package name. WA Tweaks checks the package name of the application which helps to configure the correct WhatsApp application.

    Also Read: How To Enable WhatsApp Status Feature on Android
    You can enable and disable the application features in just some clicks and then you don’t need to worry about anything if you don’t like the feature of anything. The best thing about this application is that it doesn’t consume too much memory. This application is just of 8 MB and does a lot of tasks in just some clicks which is amazing and needed for any application. There are no mods available which help you to customise your official WhatsApp but with the aid of Xposed framework you can do so with just some clicks, and you don’t need to do more settings in the application. You can also change the Emoji of your WhatsApp. If you are bored with the old emoji of WhatsApp, then you can install iOS 10 emoji on your phone. There are many features which can be done.

    Also Read: How To Disable WhatsApp Status Feature on Android

    WA Tweeks Features

    There are amazing features of the application which will help you to edit many settings in the application and just some clicks. There is a lot of tweaks available in which some of them can be found on WhatsApp, and some of them are yet to come which is great.
    • Updated daily and supports to the latest version of WhatsApp.
    • Less in size just around 8 MB and doesn’t consume too much memory.
    • You can also enable Group Invite Link if it is not pre-activated.
    • Enable mentions which help you to call a specific user in the WhatsApp group.
    • You can also enable Multicast.
    • Enable the new Photo editor of WhatsApp which will help you to edit the pictures before sending to anyone on WhatsApp.
    • Enable the new Home user interface which will allow users to check out the all new user interface which is going to come on WhatsApp.
    • You can also select the contact which was not available in the official WhatsApp.
    • You can also enable GIF Search which helps you to search for the GIF in the emoji tab and will allow in just one click.
    • Enable the all-new internal Video player which supports you if you are not having the video player on your phone.
    • You can also set the limit of sending the images and videos and increase it as much you need.
    • You can increase the documents sending limit to 999 MB.
    • Resize the emoji packer size as much as you need it.
    • Send the full resolution photo on WhatsApp which was compressed.
    • Backup and Restore the chats in just some clicks no need of registering on WhatsApp again and again.
    • Install all the new emoji of WhatsApp and Android Nougat 
    • Android 7.1 Ready which allows activating 3D touch is Android API Level 25
    • No internet connection required
    • Vcard indexing
    • Track location of your friends in any WhatsApp group.
    • Unsend send messages
    • Disable status feature
    • Enable the new info feature of WhatsApp
    • You can now send any files using WhatsApp 
    • Much more.

      Limitations:

      • Root Needed to customize your WhatsApp.
      • Some features like Settings of Application doesn’t works properly.

      Downloads

      Download WA Tweaks 2.4.4 Latest Version Apk For Android 2017 from the links mentioned below:


      Software Name                               WA Tweaks
      Last Updated May 21, 2017
      Android Version Requires 4.0+
      Total Downloads 1,000,000+
      App Size 4.1 MB
      Developer Alex193a
      Main Task Enable Hidden Features of WhatsApp

      Installation Steps

      • Be a part of Whatsapp Beta Tester Programme. Click here to join now.
      • Install the application and you might get unknown source warning.
      • Go to settings and check unknown sources. Turn on the option.
      • Now, Install it once again and Now open the application.
      • Grant the permission for Root and then you are done.
      • Enable all the features which you need to enable in WhatsApp.
      • You can also customize WhatsApp easily swiping the menu from left.

      Related Video:

      Final Words

      This way you can Download WA Tweaks Latest Version Apk For Android 2016. I hope you love this application. Enable all the tweaks and enjoy editing your WhatsApp. Thank you for visiting and keep visiting for more tips and tricks.
      Also Read: How To Send Large Files on Whatsapp (Above 1GB)
      Thankyou for visiting Droidadda. For fast access to our service Bookmark & Subscribe us now. Share this article with your friends and show how they can customize WhatsApp. If any issues then feel free to comment below. Peace out.
      Droidadda is one of worlds best online blogging portal where latest trending articles on Android,Blogging,Seo,Gadgets,Tricks,etc are daily published.

      Android O Developer Preview 2 was out two days back, and it is booming all over the internet, and it had exciting features. There is a Dot notification and along also new quick settings. We have already discussed in our previous article. We have also seen that Emoji are also changed, and they are fun. In this article, I will be telling you the way you can install Android O Emoji on any Android device.

        Android O is the latest version of the Android which will be coming soon in Q3 of this month. We are excited about this new Android O and its amazing features such as Picture in Picture mode and many other features which are eye-catching.

        Everyone loves Emoji, and we use this emoji while texting anyone on WhatsApp or sometimes via text message. We have previously seen that in Android Nougat the emoji’s were changed and again in Android O it is changed again.
        This new Emoji looks great, and when you are receiving any message in the quick settings, you will see the Android O emoji. If you want to install it on your device. Then you can flash the file on your device.
        Also Read: How to Enable Android O Boot Animation on Any Android Device


        If you want to install this emoji on your device, then you can simply flash the zip file which we have provided below in this article. You can flash the file with the help of custom recovery such as TWRP, CTR or Philz recovery.

        Android O Replacer Emoji is the small file which will help you to install the Android O Emoji on your device. You need to make sure that you have installed the all new Google keyboard on your device. You can click on the emoji tab in the keyboard, and you will find the new emoji.

        The best part about this emoji is that there will be a new emoji style in your quick settings bar too. There is entirely new changes in this API of Google, and it is cool, and you should give a try to this emoji on your device.

        Requirements

        Downloads

        Download the Flashable package of fresh Android O Emoji from the below link along with Google Keyboard.

        Android O Emoji G Keyboard

        How To Install Android O Emoji on Any Android

        • Download the zip file of Android O Emoji Replacer on your device and put in some folder
        • Switch off your device and press Volume Down + Power Key and boot your phone into recovery. Your device might be having a different combination.
        • You will be booted into the recovery mode and Click on the Install Button.
        • Search for the zip file in the folder which you have downloaded.
        • Tap on Android O Emoji Replacer file and move the slider to the right to install the file.
        • Now, the installation process will be started on your device and reboot your device and see the changes.
        • Open your Gboard and click on the emoji button and you will see all new set of the emoji

        Video Tutorial:

        Final Words

        So this was the article on install the Android O Emoji on your Android device. I'm sure it will clear all your consequences about Android O in your mind. Now you have known all the facts about Android O & I hope you love this article.
        Source: XDA
        Share this article with your friends and do let them know about this amazing application and I hope they will love it and love to install it on their device.
        Thank you for visiting Droidadda and keep visiting for more tips and tricks like this and I will meet you in the next article. Till then stay peace.
        Droidadda is one of worlds best online blogging portal where latest trending articles on Android,Blogging,Seo,Gadgets,Tricks,etc are daily published.

        SUPER TWEEKS V2.0 FOR ANDROID

        Hello Friends ! Today i am presenting you one of the best Modded script for Android. This script is based on various Tweeks including Performance, Battery life, Stability, Rendering, Netwibes, Gaming, Ram & many more. By installing this mod you will feel the power of Super Tweeks in your device. Let's discover some of the features in this mod. 

        Introduction

        Mod powerful that boosts your device's performance. It improves your device's performance along with improving battery life of your phone .
        SUPER TWEEKS is made for those who like to do high multitasking or those who love to play HD games on their device.
        This mod will work on any device. All you need to ensure is that your phone is running android.
        It doesn't matter which ROM, which version, which device etc. It runs on any rooted device running on Android 2.3+

        Features:

        • Life expectancy of the improved battery
        • Incredible improved management of your Ram
        • Improved management of networks
        • Optimized overall performance
        • Protection against ADS with ADSuper
        • Battery calibration
        • Google Play Fix Battery Drain
        • Cleaning system every boot
        • Super Entropy
        • Flags Tuner
        • FSTim
        • And Many More To Discover 😉
        Also ReadDownload & Install Samsung S8 Edge Music Player on Any android

        MINIMUM REQUIREMENTS (BEFORE FLASHING THIS MOD)

        • A rooted device with init.d support is required to run this mod which is pretty much common these days, so your device should be compatible to this mod . The installation of the mod is quite simple as it’s a flashable Zip that can be flashed using any custom recovery. So all you need to do is to download the Mod file from the download link provided below and flash it via a custom recovery.
        • Rooted phone
        • Device Kernel / ROM with init.d support ( If No support : Init.d Support
        • 10MB free in system
        • Custom recovery (CWMR, TWRP, Philz, CarlivTouch)
        • Terminal Emulator (Link)

        How To Install Super Tweeks?

        Note: Before Flashing please do a Nandroid backup to avoid any incompatibility issues.
        • Do not use with any other Mod script or apps improvement because they conflict.
        • In the case of an update, flash over
        • Delete all others script you have installed in system/etc/init.d ( Zipalign, Sqlite, setperms, System tweaks... )
        • Download the zip from Mediafire
        • Reboot your phone to recovery
        • Wipe Dalvik cache is not mandatory but highly recommended
        • Flash Zip file
        • Reboot
        • Now Enjoy ;)

        Downloads

        Download the Installer & Uninstaller of Super Tweeks V2.0 from the below link


        Final Versions in now available for you to download and experience it, DA is the popular version, you are the master of your performance and Omega , Just a flashable zip and enjoy . Nothing to do or configure.

        Note : The Standard version is most common in the world of Android , However, there are other type called X86 ( Device with an Intel / AMD processor )

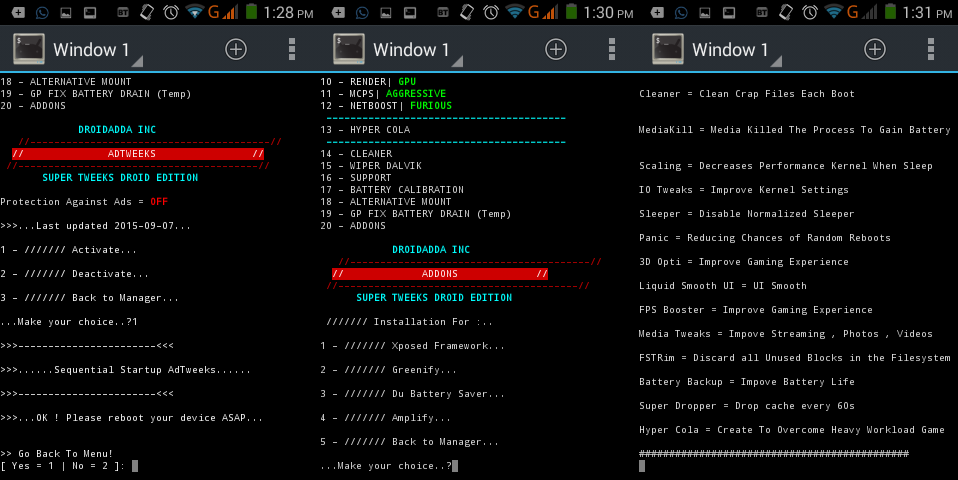
        Screenshots

        Installation Instructions

        Once the mod is installed it will take care of itself but if you want to manage the scripts, there is a manager which will let you modify the script functions.
        For this you need a terminal emulator to run the commands.
        Manager fully dedicated to the operation of Mod to make it fully functional manager to have performance Optimals( Xbooster , ADSuper , BackGround App...)

        • Open the terminal
        • Type su to get root privileges
        • Type menu and enter

        The Following Options will be available then :
        • SYSTEM INFO : Useful information about your system
        • CHECK : Check the installation of the mod
        • XBOOSTER : It clear the cache of your old system and thus gets more free RAM For you and increases performance
        • BACKGROUND APP : Function to block a demand application 
        • PROFILS : Performance profile available for VM Tweaks 
        • LMK : Performance profile available for Low Memory Killer 
        • SUPER: This function writes the kernel parameters of read_wake up_threshold read_wakeup_threshold and to improve the speed of ui . Changes the user profile entropy for the convenience 
        • MASTER : Super control with a huge collection of scripts ( Renice , Zram , Sd Tuner ,Scaling and many others ) 
        • ADSUPER : Service against the ads and malware domains 
        • RENDER : CPU OR GPU  
        • MCPS : Tweaks for Multicore only 
        • NETBOOST : Function ensures smoother navigation  
        • HYPER COLA : Script created by PizzaDox to best manage your games 
        • CLEANER : Clean your device unnecessary files to the system 
        • WIPER DALVIK : Clean your Dalvik cache engine 
        • SUPPORT : Help for the mod 
        • BATTERY CALIBRATION : Calibrating the battery for better autonomy 
        • ALTERNATIVE MOUNT : When mounting worries 
        • GP FIX BATTERY DRAIN : Fix the battery drain caused by the Google Play services
        • ADDONS : Gives the possibility to download to essential apps
        • BACKUP & RESTORE : Make a backup / restore your settings
        • SELINUX MODE : Kernel security system
        • WEBSITE : Direct link to the official page
        • FACEBOOK PAGE : Direct link to the official page FCB
        • DONATIONS : Buy me a cup of coffee if you enjoy my work. It'll motivate me to work harder and faster
        • UNINSTALL : Removal of the engine, will not leave any trace

        Included Scripts

        As i've build this tweek, i can say that Super Tweek is fully stable mod for Android Devices to optimize it.

        ►  S.T Profiles
        Several profiles are available depending on the value of your device
        Game = Created to perform well in the games
        Balance = Good compromise between games and multitasting
        Multitasting = Supports many applications open at the same time
        Force = By default, the most powerful of all
        LMK Tweeks
        Several LMK (Minfree) are available depending on the value of your device
        Light = Multitasting
        Moderate = Smoother
        Hard = Game
        ► Super
        It used to have significant lag reduction . It shows significant improvements on all devices.This function writes the kernel parameters of read_wake up_threshold read_wakeup_threshold and to improve the speed of ui.
        Entropy increases battery life and reduces lag.
        In each levels, these bits are increased
        The entropy actually different values of bits used to wake the sleeping process.
        Enlarger level is made in Zepp.
        Changes the user profile entropy for the convenience .
        Default = Original values of the android system
        Light = Similar to moderate but lower
        Moderate = Better than the default
        Agressive = Similar to moderate but higher
        Enlarger = Settings created by Zeppelinrox 
        Master
        Renice System = Priority of System Apps
        Flags Tuner = Improve Snappiness of The Overall System
        Flush Engine = AutoMod Drop cache each hour
        Governor Tuner = Sets Governors for Better Battery Backup
        HeapSize Boost = Optimized the Engine Dalvik
        Vaccum/Reindex = Optimize readings and deletions repetitive data
        Wifi Sleep = Wifi Switch in Case of Deep Sleep
        Zram = Compress the RAM it increases system responsiveness
        Zipalign = Optimization To APK
        Adreno Booster = Optimization of GPR
        SD Tuner = Improved Reading SD
        Touch = Improved Touch
        Cleaner = Clean Crap Files Each Boot
        MediaKill = Media Killed The Process To Gain Battery
        Scaling = Decreases Performance Kernel When Sleep
        Tweaks = Sets The Kernel For Good Performance
        Sleeper = Disable Normalized Sleeper
        Panic Mode = Reducing Chances of Random Reboots
        3D Optimize = Improve Gaming Experience
        FPS Booster = Improve Gaming Experience
        Media Tweaks = Improve Streaming , Photos , Videos
        Liquid Smooth = UI Smooth
        FSTRim = By default, FSTrim will discard all unused blocks in the filesystem
        Battery Backup = Best battery management
        Super Dropper = It's not an everyday option but occasionaly , For heavy games or heavy apps
        Fix GP Services = Fix the battery drain caused by the Google Play services
        Scroll Speed = Improve the scrolling of the device
        Logcat = Disabling system log for best performance
        Kill Playstore = Kill Playstore startup process for better autonomy
        KSM = Kernel same-page merging , KSM merge memory pages occupied by several processes
        TouchScreen Tweaks = This tweaks will give better touch response
        MPCS
        It manages the cores present in your system for better performance or autonomy
        Disabled : Potentially better battery life
        ON : Power save balance by loading first core it's 100% loaded
        Aggressive : Load balance the CPU cores by keeping the load even between them
        Kernel Default : Default kernel (stock or custom)
        ► NetBooster
        Internet optimization level
        Quick = Battery Friendly
        Fast = Normal
        Faster = Nearly Maxed Out
        Furious = Known Maxed Out
        SuperMax = Secret Maxed Out
        ► Tweeks Presets

        Here Presets of configuration to help news users. Each type will give significant improvements on each device but are not systematic, you have the option of coupled these types:

        # Preset Battery :
        • Profil Balance 
        • LMK Light
        • Super Agressive
        • AdSuper On
        • Render CPU
        • MPCS Disabled
        • NetBoost Quick
        • In Master = Flags Tuner / Wifi Sleep / Zipalign / Cleaner / Mediakill / Scaling / IO Tweaks / Sleeper / Liquid Smooth UI / Fstrim / Battery Backup / Fix GP Services
         # Preset Balance :
        • Profil Force
        • LMK Moderate
        • Super Default
        • AdSuper On
        • Render CPU
        • MPCS Agressive
        • NetBoost Furious
        • In Master = Renice System / Flags Tuner / Vaccum Reindex / Zram / Zipalign / Cleaner / Mediakill / Liquid Smooth / Fstrim / Fix GP Services / Scroll Speed
         # Preset Performance :
        • Profil Force
        • LMK Moderate
        • Super Enlarger
        • AdSuper On
        • Render GPU
        • MPCS Agressive
        • NetBoost Furious ( Or SuperMax but beware )
        • In Master = Renice System / Flags Tuner / Zram Swap / Zipalign / SD / Touch / Cleaner / Liquid Smooth UI / FSTrim / Fix GP Service / Scrool Speed
         # Preset Game : 
        • Profil Game
        • LMK Hard
        • Super Enlarger
        • AdSuper
        • Render GPU
        • MPCS Agressive
        • NetBoost Furious ( Or SuperMax but beware )
        • In Master = Flags Tuner / Governor Tuner / HeapSize Boost / Panic Mode / 3D Opti / Liquid Smooth / FPS Booster / Media Tweaks

        What To Do If Your Device Stuck in BootLoop?

        If bootloop or problem with a tweak. There is a tool to settle this problem without having to reformat the system.
        Init.d purge tweaks and clean Dalvik and resource. This Uninstaller doesn't purely uninstall the mod installed but inspite of doing thai it permanently disables the mod from your device so thet you can enjoy the stock experience again.
        Also Read: LSpeed Flashable Mod For Android To Optimize Your Device

        Credits

        Google ( My Best Friend )
        Sunmughan Swamy
        Droidadda
        XDA, GitHub
        Mediatek, Qualcomm Threads

        Final Words

        This was the article on Samsung S8 Edge Music Player. Now, without any issues, you can explore the features with your friends using this music player. I hope you like this article. If you face any issues feel free to comment below. 
        Thank you for visiting Droidadda and keep visiting for more tips and tricks and Android articles. Share this article among your friends to aware most of your friends about this trick.
        Droidadda is one of worlds best online blogging portal where latest trending articles on Android,Blogging,Seo,Gadgets,Tricks,etc are daily published.
        Now Increase Audio Quality on Your Android Device Easily

        Audio & Music or Video these are the important part of entertainment in everyone's life today. We used to listen to our favoutite music tracks or watch favourite videos or movies to spare our time. But if the device has low sound quality then what are the use of such media? Music is loved to be played @ high volumes. Today we'll discuss on how to play your media files on high volumes when your device is supported by low sound quality.
        Whenever we are free we love to hear music and it is the best time pass which we can do while sitting alone. Sometimes we love to hear quality songs. Today, I am going to tell you the way you can Increase Audio Quality on Any Android Device. You can install a mod on your device and this mod will help you to increase your audio quality.

        We all know that there are a number of mods and applications available on play store. This helps you to increase the sound. This mod is different from other mods. This mod helps you to increase audio quality.

        We have often seen that this problem may be encountered due to the issues of hardware or OEM. If there is a problem of hardware then this mod will not increase the volume or if it is due to your OEM then it will help you to increase the quality of your audio and this is amazing and you should give a try to this mod and it will help you a lot.
        I have personally installed this mod on my device and it works absolutely fine on my device and you should give a try to this mod in your device.

        Increase Audio Quality on any android

        Increase Audio Quality on Any Android Device

        Basically, this is a mod which we can also say a zip file which you can install it on your device by flashing this zip file on your device, it will help you to increase the audio quality. This mod can be flashed using the custom recovery.
        You can install any custom recovery you want and it will help you to increase audio quality. You can use TWRP, CTR, or Philz. Make sure that you don’t use Stock recovery to flash this file or else you will end up bricking your phone.
        There are many developers who build amazing mods such as Viper4Android and Dolby Atmos and Htc Beats Audio Mod which you can try installing on your android device.
        This mod is developed by UltraM8’s and the name of the mod is Ainur NERO. This is the amazing mod which is having a lot of features.

        Requirements:

        How to Increase Audio Quality on Any Android Device

        • Download the mod from the above-given requirements.
        • Boot your phone into recovery and you can do so by pressing Volume Down + Power Button (In some devices required Power + Vol up + Vol down). This may refer from phone to phone.
        • Click on Install button and search for the zip file.
          Increase Audio Quality on Your Android Device
          • Then, Install the zip file and then swipe the slider. Then the file will be installed on your device.
          Increase Audio Quality on Your Android Easily
          • Reboot your Android device and then you have successfully installed the zip file in your device.
          Increase Audio Quality on Your Android Easily

          Final Words:

          This way you can easily install the zip file on your android device. I hope you love this trick the way you can easily Increase Audio Quality on Any Android Device.
          Share this article with your friends and do let them know about this amazing mod. Tell us about the changes which are done in your device with the help of this mod.
          Thank you for visiting Droidadda for more articles on Android, Windows, Tips and tricks subscribe to Droidadda and keep visiting here everyday. For any suggesation, feedback, troubleshoot feel free to ask me, I'll try to solve it soon. Have a good day ahead, 😊
          Source: GadgetsHacks
          Droidadda is one of worlds best online blogging portal where latest trending articles on Android,Blogging,Seo,Gadgets,Tricks,etc are daily published.

          Android rooting is the procedure which is followed by everyone. People always try to install the SuperSU from Chainfire. You have seen that if you are rooting your Android device with the help of SuperSU then you won’t be getting OTA updates on your device. This is the reason why developer topjohnwu came up with the tool of Magisk which helps you to do systemless rooting. Today, i am going to tell you the way to Install this module on your android devices.
          If you are using Android devices above 6.0 then Google has changed its security measures and it doesn’t allow their users to root their phone with the one click rooting applications such as Framearoot or applications such as Kingoroot. Those days were over when Google launched his Android 6.0.

          This measure prevents SuperSU daemons from getting the permissions it needs to do the job at boot. In order to fix these issues chainfire created the systemless rooting method. There were many developers who started this trend and the developer topjohnwu also came up with an idea of systemless Xposed Framework.

          Install Magisk On Your Android Device

          If you are having the Android device and you ever need to download and run the applications such as Android Pay and other banking application and there you might have seen the warning of your Android device is rooted.
          This issues can be resolved if you will try to install te Magisk application on your device and this is easy and you just need a rooted android device and that’s it.
          We have seen SuperSU always updates it binaries whenever new updates arrive of SuperSU and this is the same thing which happens in the case of Magisk. Magisk will automatically download the binaries on your phone.
          Also Read: How To Install Kali NetHunter on Any Android
          There are the tons of features available in the magisk which you can try if you are installing magisk on your phone. Let’s see some amazing features of the magisk.

          Features:

          • Magic Mount: This feature will not allow the users to replace the existing files in the system directory but it will allow you to add the new files in the system. In simple words, we can say that it is possible to install all the rooted application on your device.
          • Multiple Entry Points: If “Magisk Mount” is not powerful enough to complete your goal. Magisk provides several entry points for developers to run scripts at different boot times, making developers to do whatever they want at any time.
          • If you are having applications such as Xposed and Root you don’t need to worry they depend on Magisk interface.
          • Magisk.img file will save all your systemless mod in it and its size will increase if you will install more mods on your device.
          • Remove verity / force encrypt patches SE Policy.
          Must Read: How To Backup & Restore Via ADB on WiFi

            Requirements:

            • Rooted Android Device.
            • SuperSU installed.
            • Working internet connection

            How to Install Magisk On Your Android Device

            • Download Magisk Manager on your device from
              Play Store
              • Open the application and Grant the Root permission for your device.
              Magisk
              • Now, Magisk will ask you to access the Files on your device. You need to Allow the access for your device.
              Magisk
              • Click on Magisk and it will automatically search best Mod for your device and then click on Download and Install button
              Magisk
              • The downloading will get started and I will suggest you not to do any changes in your system.
              • After downloading process it will automatically unzip the file and install it on your device.
              • This will take a while and after Installation is successfully done you need to Reboot your device.
              • Done! Open Magisk again and you will see the Successful message and done.
               

                Final Words:

                This process will help you to install magisk on your android device. I hope you love this article. If you face any issues then please feel free to comment below.
                Share this article with your friends and do let them know about this amazing Android application and hope they will love it.
                Droidadda is one of worlds best online blogging portal where latest trending articles on Android,Blogging,Seo,Gadgets,Tricks,etc are daily published.
                Android is an Open Source operating system which means the source code is available for everyone to tweak and modify. So, there are a lot of eyes looking to modify, exploit and root Android ecosystem for achieving something bigger.
                Google is making Android more secure every iteration making it difficult for the developers to gain root access on Android devices and alter system partitions. Systemless root is the latest thing in custom Android development which allows users to gain root access without altering system partition. So, you can enjoy OTA updates and other root-restricted apps even on rooted Android devices.
                Magisk is the new face of Systemless interface on Android which is aimed to make custom mods go systemless. It’s the brainchild of the XDA developer topjohnwu and is the short name for “Magic Mask” which aims to overcome the difficulties with Systemless mods.  Once you install Magisk on your device, you can choose from many modules to go entirely systemless.

                Here’s the entire feature list of Magisk:

                • Magic Mount: This feature will not only allow you to replace existing file and directories but also support adding new files and directories into the system. This means all existing mods should be possible to work systemless.
                • Multiple Entry Points: If “Magic Mount” itself is still not powerful enough to accomplish your goal, Magisk provides several entry points for developers to run scripts at different boot times, making developers do whatever they want at any time. It reliably blocks the boot process to continue before your scripts are done.
                • Magisk Manager: This app helps you manage your root status, and manage all your installed Magisk Mods (mod management is still WIP), just like Xposed Modules.
                • Remove verity / force encrypt (both are configurable through .magisk file, same as SuperSU), patches SE policy (to run scripts and support multiple root methods). This means developers won’t need to worry about boot image modifications in the future!
                • Important mods like Root, Xposed etc. can all depend on the Magisk interface.
                • magisk.img (the place to store all your systemless mods) will resize automatically to support large mods, and reclaim the space after removing contents.

                Systemless root on Android devices allow SELinux to run securely under enforcing mode, and allow installation of OTA updates without any issues. This is because systemless root doesn’t modify the system files on the device.
                With the Magisk systemless interface for Android devices, installing systemless root on Android devices has gotten easier than ever. And to top that, installing systemless root via Magisk also allows you to use Android Pay with root. To get started, you need to install Magisk systemless interface first on your Android device and then we’ll install the phh’s SuperUser systemless root for Magisk which works with Android Pay.

                Magisk requires boot image modifications, so unlocked bootloader is required to install Magisk. It is recommended to restore your device to the stock system and boot before installing Magisk.
                If you can’t do that, you must completely remove everything related to root (/system/xbin/su, /data/su.img, /sbin/su) and Xposed on your device. A custom recovery is needed to install Magisk on your Android device. Download the Magisk from below links and install it on your device using the below guide.

                Downloads 


                How to Install Magisk from TWRP Recovery

                1. Download and transfer the Magisk file from the above link and transfer it to your device’s storage.
                2. Boot your device into TWRP recovery. If you’re not sure about the process, just google how to boot into your device’s recovery mode.
                3. As you’re in the TWRP recovery, make a complete nandroid backup of your device. You can follow our definitive guide for nandroid backup from here.
                4. Tap on Install button and select the Magisk file. Swipe to confirm the flash.
                5. Once Magisk is flashed, reboot the device from the Reboot menu in TWRP.
                Also Read: How To Port Google Pixel Icon To Your android Device(100% Working)

                  How to Uninstall Magisk on your Device

                  1. Download the Magisk uninstaller from the downloads section and flash it from TWRP. This will remove Magisk from your device.
                  2. If your custom recovery cannot access data, the uninstaller will still work but you need to remove few modules manually.
                  3. To completely remove Magisk, you need to restore stock boot image and manually remove /data/magisk.img, /cache/magisk, /data/busybox from your device.
                  Must Read: List of All Google Pixel Archives For Any Android Devices
                  That's it. Once you’ve installed Magisk, you can use several mods to go completely systemless. We will cover more Magisk mods soon. So, stay tuned to Droidadda.
                  Droidadda is one of worlds best online blogging portal where latest trending articles on Android,Blogging,Seo,Gadgets,Tricks,etc are daily published.


                  SUPER TWEEKS V1.0 FOR ANDROID

                  Hello Friends ! Today i am presenting you one of the best Modded script for Android. This script is based on various Tweeks including Performance, Battery life, Stability, Rendering, Netwibes, Gaming, Ram & many more. By installing this mod you will feel the power of Super Tweeks in your device. Let's discover some of the features in this mod. 

                  QUICK INTRODUCTION

                  Mod powerful that boosts your device's performance.
                  It improves your device's performance along with improving battery life of your phone .
                  SUPER TWEEKS is made for those who like to do high multitasking or those who love to play HD games on their device.
                  This mod will work on any device.
                  All you need to ensure is that your phone is running android.
                  It doesn't matter which ROM, which version, which device etc.
                  It runs on any rooted device running on Android 2.3+

                  FEATURES:

                  COMPLETE SOLUTION
                  Life expectancy of the improved battery
                  Incredible improved management of your Ram
                  Improved management of networks
                  Optimized overall performance
                  Protection against ADS with ADNItro
                  Battery calibration
                  Google Play Fix Battery Drain
                  Cleaning system every boot
                  Nitro Entropy
                  Flags Tuner
                  FSTim

                  And Many More To Discover 😉

                  MINIMUM REQUIREMENTS (BEFORE FLASHING THIS MOD):
                   
                  A rooted device with init.d support is required to run this mod which is pretty much common these days, so your device should be compatible to this mod . The installation of the mod is quite simple as it’s a flashable Zip that can be flashed using any custom recovery. So all you need to do is to download the Mod file from the download link provided below and flash it via a custom recovery.
                  1. Rooted phone
                  2. Device Kernel / ROM with init.d support ( If No support : Init.d Support
                  3. 10MB free in system
                  4. Custom recovery (CWMR, TWRP, Philz, CarlivTouch)
                  5. Terminal Emulator (Link)
                  HOW TO INSTALL THIS MOD ?


                  Before Flashing please do a nandroid backup to avoid any incompatibility issues

                  Do not use with any other Mod script or apps improvement because they conflict.

                  In the case of an update, flash over

                  1. Delete all others script you have installed in system/etc/init.d ( Zipalign, Sqlite, setperms, System tweaks... )
                  2. Download the zip from Mediafire
                  3. Reboot your phone to recovery
                  4. Wipe Dalvik cache is not mandatory but highly recommended
                  5. Flash Zip file
                  6. Reboot
                  7. Now Enjoy ;)
                  DOWNLOAD SECTION


                  Two Versions are available to you , VISION is the popular version, you are the master of your performance and Omega , Just a flashable zip and enjoy . Nothing to do or configure.

                  Note : The Standard version is most common in the world of Android , However, there are other type called X86 ( Device with an Intel / AMD processor )


                  STRICT INSTRUCTIONS TO BE FOLLOWED DURING INSTALLATION:

                  Once the mod is installed it will take care of itself but if you want to manage the scripts, there is a manager which will let you modify the script functions.
                  For this you need a terminal emulator to run the commands.
                  Manager fully dedicated to the operation of Mod to make it fully functional manager to have performance Optimals( Xbooster , ADNitro , BackGround App...)
                  1.   Open the terminal
                  2.   Type su to get root privileges
                  3.   Type menu
                  The Following Options will be available then :

                  1. SYSTEM INFO : Useful information about your system
                  2. CHECK : Check the installation of the mod
                  3. XBOOSTER : It clear the cache of your old system and thus gets more free RAM For you and increases performance
                  4. BACKGROUND APP : Function to block a demand application 
                  5. PROFILS : Performance profile available for VM Tweaks 
                  6. LMK : Performance profile available for Low Memory Killer 
                  7. SUPER: This function writes the kernel parameters of read_wake up_threshold read_wakeup_threshold and to improve the speed of ui . Changes the user profile entropy for the convenience 
                  8. MASTER : Nitro X control with a huge collection of scripts ( Renice , Zram , Sd Tuner ,Scaling and many others ) 
                  9. ADSUPER : Service against the ads and malware domains 
                  10. RENDER : CPU OR GPU  
                  11. MCPS : Tweaks for Multicore only 
                  12. NETBOOST : Function ensures smoother navigation  
                  13. HYPER COLA : Script created by PizzaDox to best manage your games 
                  14. CLEANER : Clean your device unnecessary files to the system 
                  15. WIPER DALVIK : Clean your Dalvik cache engine 
                  16. SUPPORT : Help for the mod 
                  17. BATTERY CALIBRATION : Calibrating the battery for better autonomy 
                  18. ALTERNATIVE MOUNT : When mounting worries 
                  19. GP FIX BATTERY DRAIN : Fix the battery drain caused by the Google Play services
                  20. ADDONS : Gives the possibility to download to essential apps
                  21. BACKUP & RESTORE : Make a backup / restore your settings
                  22. SELINUX MODE : Kernel security system
                  23. ACCES XDA THREAD : Direct link to the official page
                  24. ACCES FACEBOOK PAGE : Direct link to the official page FCB
                  25. DONATIONS : Buy me a cup of coffee if you enjoy my work. It'll motivate me to work harder and faster
                  26. UNINSTALL : Removal of the engine, will not leave any trace
                  SUPER TWEEKS --> INCLUDED SCRIPTS
                   
                  As you guessed, Nitro X is full of all kinds of optimizations, here explicaton for all.

                  ST PROFILES
                  Several profiles are available depending on the value of your device
                  Game = Created to perform well in the games
                  Balance = Good compromise between games and multitasting
                  Multitasting = Supports many applications open at the same time
                  Force = By default, the most powerful of all


                  LMK TWEEKS
                  Several LMK (Minfree) are available depending on the value of your device
                  Light = Multitasting
                  Moderate = Smoother
                  Hard = Game


                  SUPER
                  It used to have significant lag reduction . It shows significant improvements on all devices.
                  This function writes the kernel parameters of read_wake up_threshold read_wakeup_threshold and to improve the speed of ui.
                  Entropy increases battery life and reduces lag.
                  In each levels, these bits are increased
                  The entropy actually different values of bits used to wake the sleeping process.
                  Enlarger level is made in Zepp.


                  Changes the user profile entropy for the convenience .

                  Default = Original values of the android system
                  Light = Similar to moderate but lower
                  Moderate = Better than the default
                  Agressive = Similar to moderate but higher
                  Enlarger = Settings created by Zeppelinrox


                  MASTER
                  1. Renice System = Priority of System Apps
                  2. Flags Tuner = Improve Snappiness of The Overall System
                  3. Flush Engine = AutoMod Drop cache each hour
                  4. Governor Tuner = Sets Governors for Better Battery Backup
                  5. HeapSize Boost = Optimized the Engine Dalvik
                  6. Vaccum/Reindex = Optimize readings and deletions repetitive data
                  7. Wifi Sleep = Wifi Switch in Case of Deep Sleep
                  8. Zram = Compress the RAM it increases system responsiveness
                  9. Zipalign = Optimization To APK
                  10. Adreno Booster = Optimization of GPR
                  11. SD Tuner = Improved Reading SD
                  12. Touch = Improved Touch
                  13. Cleaner = Clean Crap Files Each Boot
                  14. MediaKill = Media Killed The Process To Gain Battery
                  15. Scaling = Decreases Performance Kernel When Sleep
                  16. Tweaks = Sets The Kernel For Good Performance
                  17. Sleeper = Disable Normalized Sleeper
                  18. Panic Mode = Reducing Chances of Random Reboots
                  19. 3D Opti = Improve Gaming Experience
                  20. FPS Booster = Improve Gaming Experience
                  21. Media Tweaks = Improve Streaming , Photos , Videos
                  22. Liquid Smooth = UI Smooth
                  23. FSTRim = By default, FSTrim will discard all unused blocks in the filesystem
                  24. Battery Backup = Best battery management
                  25. Super Dropper = It's not an everyday option but occasionaly , For heavy games or heavy apps
                  26. Fix GP Services = Fix the battery drain caused by the Google Play services
                  27. Scroll Speed = Improve the scrolling of the device
                  28. Logcat = Disabling system log for best performance
                  29. Kill Playstore = Kill Playstore startup process for better autonomy
                  30. KSM = Kernel same-page merging , KSM merge memory pages occupied by several processes
                  31. TouchScreen Tweaks = This tweaks will give better touch response
                  MPCS
                  It manages the cores present in your system for better performance or autonomy
                  Disabled : Potentially better battery life
                  ON : Power save balance by loading first core it's 100% loaded
                  Aggressive : Load balance the CPU cores by keeping the load even between them
                  Kernel Default : Default kernel (stock or custom)


                  NETBOOST
                  Internet optimization level

                  Quick = Battery Friendly
                  Fast = Normal
                  Faster = Nearly Maxed Out
                  Furious = Known Maxed Out
                  SuperMax = Secret Maxed Out


                  PRESETS OF THE TWEEKS

                  Here Presets of configuration to help news users .
                  Each type will give significant improvements on each device but are not systematic, you have the option of coupled these types.

                  # Preset Battery :
                  Profil Balance
                  LMK Light
                  Nitro Agressive
                  AdSuper On
                  Render CPU
                  MPCS Disabled
                  NetBoost Quick
                  In Master = Flags Tuner / Wifi Sleep / Zipalign / Cleaner / Mediakill / Scaling / IO Tweaks / Sleeper / Liquid Smooth UI / Fstrim / Battery Backup / Fix GP Services

                   # Preset Balance :

                  Profil Force
                  LMK Moderate
                  Nitro Default
                  Ad
                  Super On
                  Render CPU
                  MPCS Agressive
                  NetBoost Furious
                  In Master =
                  Renice System / Flags Tuner / Vaccum Reindex / Zram / Zipalign / Cleaner / Mediakill / Liquid Smooth / Fstrim / Fix GP Services / Scroll Speed

                   # Preset Performance :

                  Profil Force
                  LMK Moderate
                  Nitro Enlarger
                  AdNitro On
                  Render GPU
                  MPCS Agressive
                  NetBoost Furious ( Or SuperMax but beware )
                  In Master = Renice System / Flags Tuner / Zram Swap / Zipalign / SD / Touch / Cleaner / Liquid Smooth UI / FSTrim / Fix GP Service / Scrool Speed

                   # Preset Game :

                  Profil Game
                  LMK Hard
                  Nitro Enlarger
                  Ad
                  Super
                  Render GPU
                  MPCS Agressive
                  NetBoost Furious ( Or SuperMax but beware )
                  In Master = Flags Tuner / Governor Tuner / HeapSize Boost / Panic Mode / 3D Opti / Liquid Smooth / FPS Booster / Media Tweaks

                  HOW TO SURVIVE THE BOOTLOOP ?

                  If bootloop or problem with a tweak.
                  There is a tool to settle this problem without having to reformat the system.


                  Init.d purge tweaks and clean Dalvik and resource. This Uninstaller doesn't purely uninstall the mod installed but inspite of doing thai it permanently disables the mod from your device so thet you can enjoy the stock experience again.


                  CREDITS

                  • XDA THREADS
                  • GOOGLE
                  • SPARX DEVS
                  • IMAD MD
                  • SUNMUGHAN SWAMY
                  • DROIDADDA 
                  • MEDIATEK DEV'S
                  • QUALCOMM DEV'S