Articles by "Blogger Plugins"
Showing posts with label Blogger Plugins. Show all posts
Droidadda is one of worlds best online blogging portal where latest trending articles on Android,Blogging,Seo,Gadgets,Tricks,etc are daily published.

In the last few weeks i have noticed that famous Websites (such as Droidadda, Techcrunch,  Huffington Post) now have a “read more” link on any text that is copied and pasted from their site. This can be a good way to get new visitors to your site as many people will copy and paste text from websites into an email. People also often save information for future reference, or just share it with friends, family or colleagues. There are a few ways to do this, and in this article we are going to show you how.

1. Tynt

Tynt is a hosted solution which requires you to sign up and Tynt will create a code to insert onto your website. It is also available in a WordPress plugin: Tynt WP Plugin. Tynt also offer analytics on users coming to your site via these pasted links.
Although this service does appear to work well and is easy to setup, we do not really recommend this method based on the comments on this page.

2. Javascript 

  • For Bloggers

You can copy and paste the below javascript into the >head< section of your page.

<script type="text/javascript">// <!&#91;CDATA&#91;
function addLink() {
    if (
window.getSelection().containsNode(
document.getElementsByClassName('entry-content')&#91;0&#93;, true)) {    
 var body_element = document.getElementsByTagName('body')&#91;0&#93;;
    var selection;
    selection = window.getSelection();
    var oldselection = selection
    var url = document.URL
    var pagelink = "
Read more at The Web Taylor: PAGE TITLE HERE <a href='" + url + "'>" + url + "</a>"; // Change this to suit
    var copy_text = selection + pagelink;
    var new_div = document.createElement('div');
    new_div.style.left='-99999px';
    new_div.style.position='absolute';
 body_element.appendChild(new_div );
    new_div.innerHTML = copy_text ;
    selection.selectAllChildren(new_div );
    window.setTimeout(function() {
        body_element.removeChild(new_div );
    },0);
}}
document.oncopy = addLink;
// &#93;&#93;></script>
  • For Wordpress Users

Or if you are using WordPress, copy and paste the below code into your functions.php file.

function add_copyright_text() {
if (is_single()) { ?>

 }}
add_action( 'wp_head', 'add_copyright_text');

Final Words

This article has been written for the seek of those users who spent hours on writing a blog post and the copy cats stole their work in minutes by just copying the whole post. Now fell free youl post will be copied along with your post like. If the copy user removes your blog post link the copy contents won't appear on his blog 😉
Droidadda is one of worlds best online blogging portal where latest trending articles on Android,Blogging,Seo,Gadgets,Tricks,etc are daily published.

Hello Friends! Today i will share an amazing and most wanted tips for Bloggers. As we all know blogging is most widely used social platform today. Blogging gets more user attraction then any other social media like Facebook,twitter, Whatsapp, etc.
Now i have decided to give you my top 10 blogger widget. Today i am writing an article on Rating widget for blogger. Yes you heard right im am telling the truth 😜 I knew you all see this in Wordpress blogs and Big websites. After reading this post you'll also be able to add 5-Star Rating Widget on your blogger blogs and make it more attractive among your friends. This will improve your blog interface and visitors will love this.
The rating widget will look like this as shown below:

Now Lets Begin To The Main Thread

Starting from here! I have given the steps to add this widget in your blogger/wordpress account. Strictly follow my words, else you'll not be able to see the widget working on your blogger/wordpress account.

Step 1: First click on Rating Widget website and wait for the page to load.
Step 2: Now click on Get mt free widget

Step 3: Now click on Javascript from the bundle of options.

 Step 5: Now you'll be forced to Register/Login. Juts do follow the step and you'll see the code like this.

Step 6: Now open Blogger and login with your credentials.

Step 7: After Logged on your Blogger, Click on Theme like shown below.

 Step 8: Now click on Edit HTML option.

Step 9: You'll see a template editor on your browser window like this.

Step 10: Now search for this code: </body> and copy the below code & paste it above </body>


Step 11: Now search for this code: <h1 class='post-title entry-title'> and paste the below code just after </a>

Step 12: Save your template and see the magic.
Also Read: Stylish Themed Sitemaps for Bloggers

Final Words: 

This article has been tested and verified by me (+Sunmughan Swamy) before posting here. So please don't dare to copy this. 😜
Must Read: Change 'Back To Top' Button to Moving Rocket Effect on Blogger/Blogspot
If you like this article please rate it and comment below!
Droidadda is one of worlds best online blogging portal where latest trending articles on Android,Blogging,Seo,Gadgets,Tricks,etc are daily published.

Change 'Back To Top' Button to Moving Rocket Effect on Blogger/Blogspot


In this tutorial I want to show you 'How to give/change normal 'Back to Top' button to Moving-Rocket effect as you are seeing on my blog.

Step:1
Go to Blogger> Template > Edit HTML, Find this code ]]></b:skin></style>

After finding the above code, place the below code before the above code.
/* Back to Top Roket meluncur */
#scrolltop{display:none}
#rocketmeluncur{position:fixed;bottom:50px;z-index:7;display:none;visibility:hidden;width:26px;height:48px;right:25px;background:url(http://1.bp.blogspot.com/-UR9I7YEuEUY/VXIJn8MrBPI/AAAAAAAAKRE/qZObHBd5zIo/s1600/rocket.png) 50% 0 no-repeat;opacity:0;-webkit-transition:visibility .6s cubic-bezier(.6,.04,.98,.335),opacity .6s cubic-bezier(.6,.04,.98,.335),-webkit-transform .6s cubic-bezier(.6,.04,.98,.335);-moz-transition:visibility .6s cubic-bezier(.6,.04,.98,.335),opacity .6s cubic-bezier(.6,.04,.98,.335),-moz-transform .6s cubic-bezier(.6,.04,.98,.335);transition:visibility .6s cubic-bezier(.6,.04,.98,.335),opacity .6s cubic-bezier(.6,.04,.98,.335),transform .6s cubic-bezier(.6,.04,.98,.335)}
#rocketmeluncur i{display:block;margin-top:48px;height:14px;background:url(http://1.bp.blogspot.com/-UR9I7YEuEUY/VXIJn8MrBPI/AAAAAAAAKRE/qZObHBd5zIo/s1600/rocket.png) 50% -48px no-repeat;opacity:.5;-webkit-transition:-webkit-transform .2s;-moz-transition:-moz-transform .2s;transition:transform .2s;-webkit-transform-origin:50% 0;-moz-transform-origin:50% 0;transform-origin:50% 0}
#rocketmeluncur:hover{background-position:50% -62px}
#rocketmeluncur:hover i{background-position:50% 100%;-webkit-animation:flaming .7s infinite;-moz-animation:flaming .7s infinite;animation:flaming .7s infinite}#rocketmeluncur.showrocket{visibility:visible;opacity:1}
#rocketmeluncur.launchrocket{background-position:50% -62px;opacity:0;-webkit-transform:translateY(-800px);-moz-transform:translateY(-800px);-ms-transform:translateY(-800px);transform:translateY(-800px);pointer-events:none}
#rocketmeluncur.launchrocket i{background-position:50% 100%;-webkit-transform:scale(1.4,3.2);-moz-transform:scale(1.4,3.2);transform:scale(1.4,3.2)}

Step:2
After the above step, copy the below HTML and J-query codes and place them before the "
tag in template editor.

<a href="javascript:void(0);" id="rocketmeluncur" class="showrocket" ><i></i></a>
<script type='text/javascript'>
//<![CDATA[

jQuery(window).scroll(function(){jQuery(window).
scrollTop()<50?jQuery("#rocketmeluncur").slideUp(500):
jQuery("#rocketmeluncur").slideDown(500);
var e=jQuery("#ft")[0]?jQuery("#ft")[0]:
jQuery(document.body)[0],t=$("rocketmeluncur"),
n=(parseInt(document.documentElement.clientHeight),
parseInt(document.body.getBoundingClientRect().top),
parseInt(e.clientWidth)),r=t.clientWidth;
if(1e3>n){var l=parseInt(fetchOffset(e).left);
l=r>l?2*l-r:l,t.style.left=n+l+"px"}
else t.style.left="auto",t.style.right="10px"}),
jQuery("#rocketmeluncur").click(function()
{jQuery("html, body").animate({scrollTop:"0px",
display:"none"},{duration:600,easing:"linear"});
var e=this;this.className+=" launchrocket",
setTimeout(function(){e.className="showrocket"},
800)});

//]]>
</script>
Step:3
Click on the 'Save Template' button to save. And open your homepage to view the result.


Save the template in Blogspot


Have any questions about this tutorial, feel free to ask me in the below comment section.
Feel free to share.


Droidadda is one of worlds best online blogging portal where latest trending articles on Android,Blogging,Seo,Gadgets,Tricks,etc are daily published.

Syntax Highlighter For Blogger Using Google Prettify 

In this tutorial we are going to see how to add syntax highter to blogger. I am using google code prettify to add syntax highlighter to blogger.

It's very very light in weight i.e almost only 16KB.
It's very very simple to add to your blogger.
Using this syntax highter you can add following languages to your blogger HMTL5, CSS3,  PHP, SQL, Java, XML, Javascript, jQuery, Angularjs, Knockoutjs, Python, Bash, SQL, Makefiles, Ruby, VB, Awk, Perl, Pascal, Dart, Matlab, Clojure and etc.


Syntax Highlighter Blogger Using Google Prettify

Syntax Highlighter Blogger Using Google Prettify

Adding Google Code Prettifier To Blogger:

Copy following line of Google Prettifier javascript library and add it to your blogger just before </head> tag.

<script src="https://google-code-prettify.googlecode.com/svn/loader/run_prettify.js"></script>
 
Please refer this below image to add Google code highlighter to blogger.


Adding Google Prettifier to Blogger

Steps:

1. Click on Template in the left side.
2. Now click on Edit HMTL button, it will open html editor.
3. Now search for
tage and paste code just above the tag.

Add HTML Code in Blogger Post:

If you are going to put html in your blogger post, please follow the this few steps.
Note: Before you are going to add html to blogger post you convert it as xml compatible one. that html to plain text usign this html to xml parser tool  .
If I am going  to add following line html code in blogger post.
<footer class="footer">
<div class="container">
<p class="text-muted text-center">
Copy right by <a href="http://www.droidadda.org/">
Droidadda</a>
</p>
</div>
</footer>
Copy your html code and paste in the html to xml parser tool, Now it will automatically parse the html code in to xml compatible code.


HMTL TO XML PARSER TOOL
 Now copy the converted code and paste it in your blogger post, between this
<pre class='prettyprint'>...</pre> tag.  
 
<pre class='prettyprint'>...</pre> 


Now switch to html editor and paste your html between <pre class='prettyprint'>.....</pre> tag. 

<pre class='prettyprint'>.....</pre>
 
Once you are to added successfully your code will like this.
<footer class="footer">
<div class="container">
<p class="text-muted text-center">
Copy right by <a href="http://www.droidadda.org/"> 
Droidadda</a>
</p>
</div>
</footer>
If you are going to add whatever the code to your blogger post, please convert it to xml compatible one before it added to blogger post using that html to xml parser tool.

Add CSS Code in Blogger Post:


<style>
body{
font-family: Droid Sans;
background-color: #fff;
color: #000;
font-size: 14px;
line-height: 20px;
}
</style>

Add PHP Script in Blogger Post: 


/*
 * Site : http:www.droidadda.org
 * Author : Sunmughan Swamy
 *
 */
define('BASE_PATH','http://localhost/copypaste/');
define('DB_HOST', 'localhost');
define('DB_NAME','copypaste');
define('DB_USER','root');
define('DB_PASSWORD','');

$con=mysqli_connect( DB_HOST, DB_USER, DB_PASSWORD,
DB_NAME);
// Check connection
if (mysqli_connect_errno())
  {
  echo "Failed to connect to MySQL: "
. mysqli_connect_error();
  }

?>


Add Javascript or jQuery Script in Blogger Post:


<script>
$document().on('change','.coverimage',
function(){
files = this.files;
size = files[0].size;
//max size 50kb => 50*1000
if( size > 50*1000 ){
alert('Please upload less than 50kb file');
return false;
}
return true;
});
</script>

Add Java code in Blogger Post:


class Sunmughan {
public:
// Sunmughan Swamy
static const string NAME = "Sunmughan";
}

Add SQL query in Blogger Post:


SELECT * FROM sample;

Please refer it official documentation, if you want to add different themes of syntax highlighter.


Note: This post was referenced from Smart Tutorials | You can visit this page for more related articles.
Droidadda is one of worlds best online blogging portal where latest trending articles on Android,Blogging,Seo,Gadgets,Tricks,etc are daily published.


When it comes to SEO, we know that link building is an ongoing process, but more often than not, we tend to neglect the on-page SEO aspects.
Site updates, theme updates/changes, plugin updates, adding a new plugin/functionality, and other changes like updating a file using FTP can cause some accidental errors that could lead to on-page SEO issues. Unless you proactively look for these errors, they will go unnoticed and will negatively influence your organic rankings.
For instance, I recently realized that I had been blocking out images in one of my blogs for almost 6 months because of an old and neglected Robots.txt file. Imagine the impact such a mistake could have on your rankings!

On-Page SEO Checkup

Keeping the importance of SEO in mind, here are 7 important checks that you need to conduct on a periodic basis to ensure that your on-page SEO is on point.
Note: Even though these checks are for people running a WordPress blog, they can be used for any blogger on any platform.

1. Check your site for broken links.
Pages with broken links (be it an internal or external link) can potentially lose rankings in search results. Even if you do have control over internal links, you do not have control over external links.

There is a huge possibility that a webpage or resource that you linked to no longer exists or has been moved to a different URL, resulting in a broken link.
This is why it is recommended to check for broken links periodically.
There is a whole host of ways to check for broken links, but one of the easiest and most efficient ways is with the ScreamingFrog SEO Software.
To find broken links on your site using ScreamingFrog, enter your domain URL in the space provided and click the “Start” button. Once the crawling is complete, select the Response Codes tab and filter your results based on “Client Error (4xx)”. You should now be able to see all links that are broken.
Click on each broken link and then select the Inlinks tab to see which page(s) actually contain this broken link. (Refer to image below.)
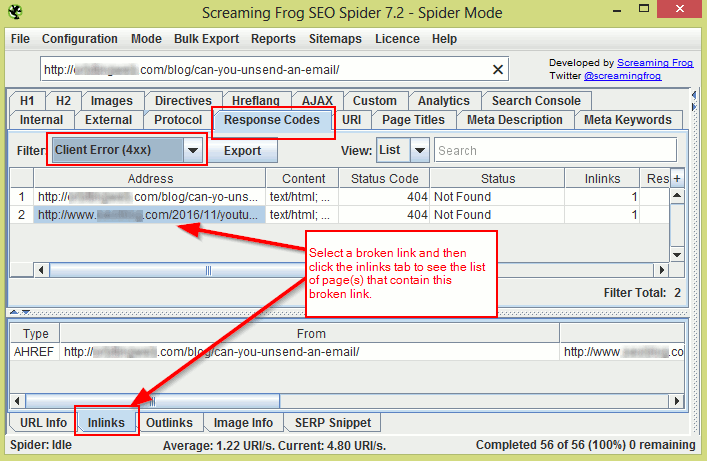
Screamingfrog links checker
 
If you are using WordPress, you can also use a plugin like the Broken Link Checker. This plugin will find and fix all broken links.
Another way to check for broken links is through the Google Search Console. Log in and go to Crawl > Crawl Errors and check for “404” and “not found” errors under the URL Errors section.
If you do find 404 URLs, click on the URL and then go to the Linked From tab to see which page(s) contain this broken URL.

2. Use the site command to check for the presence of low-value pages in the Google index.
The command operator “site:sitename.com” displays all pages on your site indexed by Google.


By roughly scanning through these results, you should be able to check if all pages indexed are of good quality or if there are some low-value pages present.
Quick Tip: If your site has a lot of pages, change the Google Search settings to display 100 results at a time. This way you can easily scan through all results quickly.
An example of a low-value page would be the ‘search result’ page. You might have a search box on your site, and there is a possibility that all search result pages are being crawled and indexed. All these pages contain nothing but links, and hence are of little to no value. It is best to keep these pages from getting indexed.
Another example would be the presence of multiple versions of the same page in the index. This can happen if you run an online store and your search results have the option of being sorted.

Here’s an example of multiple versions of the same search page:
  • http://sitename.com/products/search?q=chairs
  • http://sitename.com/products/search?q=chairs&sort=price&dir=asc
  • http://sitename.com/products/search?q=chairs&sort=price&dir=desc
  • http://sitename.com/products/search?q=chairs&sort=latest&dir=asc
  • http://sitename.com/products/search?q=chairs&sort=latest&dir=desc
You can easily exclude such pages from being indexed by disallowing them in Robots.txt, or by using the Robots meta tag. You can also block certain URL parameters from getting crawled using the Google Search Console by going to Crawl > URL Parameters.

3. Check Robots.txt to see if you are blocking important resources.
When using a CMS like WordPress, it is easy to accidentally block out important content like images, javascript, CSS, and other resources that can actually help the Google bots better access/analyze your website.

For example, blocking out the wp-content folder in your Robots.txt would mean blocking out images from getting crawled. If the Google bots cannot access the images on your site, your potential to rank higher because of these images reduces. Similarly, your images will not be accessible through Google Image Search, further reducing your organic traffic.
In the same way, if Google bots cannot access the javascript or CSS on your site, they cannot determine if your site is responsive or not. So even if your site is responsive, Google will think it is not, and as a result, your site will not rank well in mobile search results.
To find out if you are blocking out important resources, log in to your Google Search Console and go to Google Index > Blocked Resources. Here you should be able to see all the resources that you are blocking. You can then unblock these resources using Robots.txt (or through .htaccess if need be).
For example, let’s say you are blocking the following two resources:
  • /wp-content/uploads/2017/01/image.jpg
  • /wp-includes/js/wp-embed.min.js
You can unblock these resources by adding the following to your Robots.txt file:
  • Allow: /wp-includes/js/
  • Allow: /wp-content/uploads/
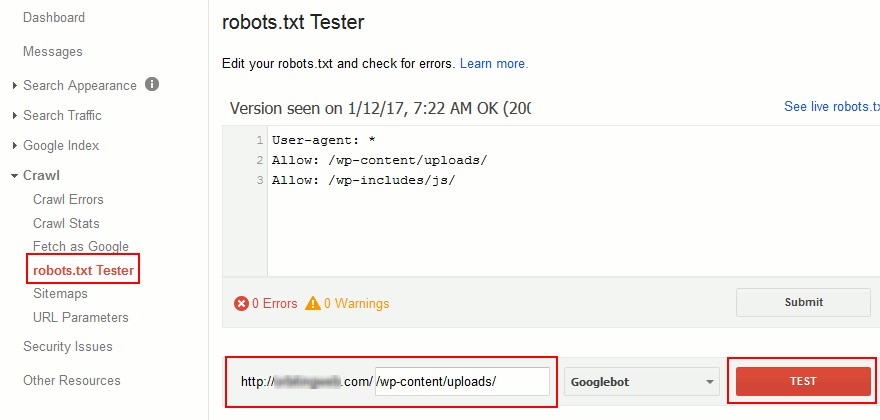
To double check if these resources are now crawlable, go to Crawl > Robots.txt tester in your Google Search console, then enter the URL in the space provided and click “Test”.


4. Check the HTML source of your important posts and pages to ensure everything is right.
It’s one thing to use SEO plugins to optimize your site, and it’s another thing to ensure they are working properly. The HTML source is the best way to ensure that all of your SEO-based meta tags are being added to the right pages. It’s also the best way to check for errors that need to be fixed.
If you are using a WordPress blog, you only need to check the following pages (in most cases):
  1. Homepage/Frontpage (+ one paginated page if homepage pagination is present)
  2. Any single posts page
  3. One of each archive pages (first page and a few paginated pages)
  4. Media attachment page
  5. Other pages – if you have custom post pages
As indicated, you only need to check the source of one or two of each of these pages to make sure everything is right.
To check the source, do the following:
  1. Open the page that needs to be checked in your browser window.
  2. Press CTRL + U on your keyboard to bring up the page source, or right-click on the page and select “View Source”.
  3. Now check the content within the ‘head’ tags ( ) to ensure everything is right.
Here are a few checks that you can perform:
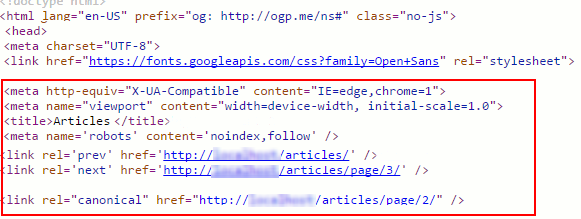
  1. Check to see if the pages have multiple instances of the same meta tag, like the title or meta description tag. This can happen when a plugin and theme both insert the same meta tag into the header.
  2. Check to see if the page has a meta robots tag, and ensure that it is set up properly. In other words, check to make sure that the robots tag is not accidentally set to Noindex or Nofollow for important pages. And make sure that it is indeed set to Noindex for low value pages.
  3. If it is a paginated page, check if you have proper rel=”next” and rel=”prev” meta tags.
  4. Check to see if pages (especially single post pages and the homepage) have proper OG tags (especially the “OG Image” tag), Twitter cards, other social media meta tags, and other tags like Schema.org tags (if you are using them).
  5. Check to see if the page has a rel=”canonical” tag and make sure that it is showing the proper canonical URL.
  6. Check if the pages have a viewport meta tag. (This tag is important for mobile responsiveness.)

5. Check for mobile usability errors.
Sites that are not responsive do not rank well in Google’s mobile search results. Even though your site is responsive, there is no saying what Google bots will think. Even a small change like blocking a resource can make your responsive site look unresponsive in Google’s view.


So even if you think your site is responsive, make it a practice to check if your pages are mobile friendly or if they have mobile usability errors.
To do this, log in to your Google Search Console and go to Search Traffic > Mobile Usability to check if any of these pages show mobile usability errors.
You can also use the Google mobile friendly test to check individual pages.

6. Check for render blocking scripts.
You might have added a new plugin or functionality to your blog which could have added calls to many javascript and CSS files on all pages of your site. The plugin’s functionality might be for a single page, yet calls to its javascript and CSS are on all pages.

For example, you might have added a contact form plugin that only works on one page – your contact page. But the plugin might have added its Javascript files on every page.
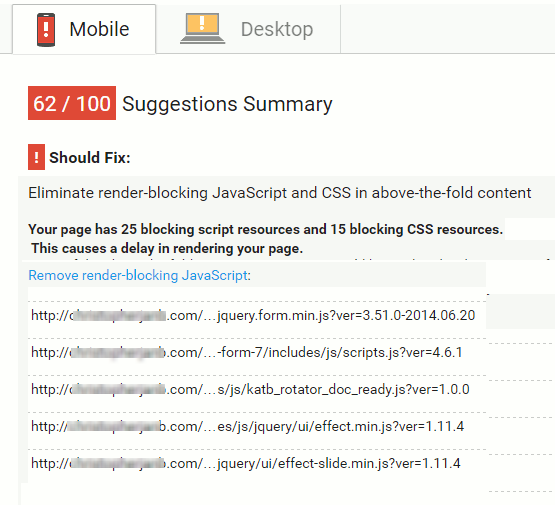
The more javascript and CSS references a page has, the longer it takes to load. This reduces your page speed which can negatively impact your search engine rankings.
The best way to ensure this does not happen is to check your site’s article pages using Google’s PageSpeed Insights tool on a regular basis. Check to see if there are render-blocking Javascript files and figure out if these scripts are needed for the page to function properly.


If you find unwanted scripts, restrict these scripts only to pages that require them so they don’t load where they are not wanted. You can also consider adding a defer or async attribute to Javascript files. 

7. Check and monitor site downtimes.
Frequent downtimes not only drive visitors away, they also hurt your SEO. This is why it is imperative to monitor your site’s uptime on a constant basis.
There are a host of free and paid services like Uptime Robot, Jetpack Monitor, Pingdom, Montastic, AreMySitesUp, and Site24x7 that can help you do just that. Most of these services will send you an email or even a mobile notification to inform you of site downtimes. Some services also send you a monthly report of how your site performed.
If you find that your site experiences frequent downtimes, it is time to consider changing your web host.

Things To Monitor For Proper On-Page SEO

These are some very important things to check for so that your on-page SEO stays highly optimized.
Conducting these checks on a regular basis will ensure that your on-site SEO is on point and that your rankings are not getting hurt without your knowledge.
Let me know what kinds of things you check for when doing an SEO site audit. What do you do to make sure your on-page SEO stays optimized? Let me know in the comments below!

Like this post? Don’t forget to share it!
Droidadda is one of worlds best online blogging portal where latest trending articles on Android,Blogging,Seo,Gadgets,Tricks,etc are daily published.

Hello Everyone ! I'm here again with an amazing trick for bloggers. This time i will share how to Add Facebook like box widget in blogger blog? Facebook will give the opportunity to promote your blog dramatically. Thousands of people use facebook regularly. If we use facebook for promoting our blog, we can drive thousands of visitors every day. But to do this, we must have a niche community. The best option to make this community is promoting our blog through facebook like box.


If we add facebook like box widget on our blog, people will have the opportunity to like our facebook page from our blog. Adding a facebook like box will increase visitors in this way. Here I will show you how to add facebook like box widget on a blogger blog. So, follow my instruction carefully.

Add Facebook Like box Widget In Blogger:

METHOD 1:
1. Log in to your blogger account and choose your blog from the left drop down.

2. Click on the layout section

3. Now come to the sidebar area and click on the add widget link.
Add facebook like box widget in blogger-1

4. A new popup will open before you, choose HTML/javaScript from the list. Click on the blue plus button to add this in your blog.


5. Now copy the iframe code and paste it into the box as shown below.


Code:


6. Replace the highlighted “droidadda” with your facebook page id or number. You can also increase or decrease the widget’s width by changing the highlighted width="300". Click on the save button and then press save changes.
Go to your blog and refresh it. You will see the facebook like box widget appear.

In this way, you have to create your own facebook fan page via facebook developer. After creating the facebook fan page, you will be able to generate your own iframe code to embed the facebook like box on your blog. This is also very easy method. It needs few more clicks than the method 1. Let’s do it.
1. Go to the facebook developer page and log in with your facebook login details.

2. Scroll down a little bit. If your fan page is associated with the logged in facebook account then this will get your facebook fan page URL automatically. Otherwise, you can copy your facebook fan page URL (As like: https://www.facebook.com/droidadda/) and paste it into the “Facebook Page URL” box. Here is a screenshot:


3. If you wish to show your fan page timeline right after the like box then leave the “Tabs” section as it is. Otherwise, remove the word “timeline” from the box.

4. You can also decide the custom height and width for your facebook like box but I recommend to leave it blank and check “Adapt to plugin container width and Show Friend’s Faces” boxes. (See the screenshot above).

5. If the configuration is done then click on the “Get Code” button. A popup box will open. At the top of this box, you will see the “IFrame” link. Click on that. Now copy the iframe code as shown below.

There you will see 2 options : Javascript JDK & iframe. Select the one you want for your blog.
Here is an example for Javascript JDK:


And this is for iframe:


6. Login to your blogger account > Go to the “Layout” section > Click on the “Add a gadget” link of the sidebar or where ever you need to appear your like box > Add an “HTML/JavaScript” widget > Paste the code into the box and save your template. That’s it.
Now go to your blog and refresh it. Hope you will see that your facebook like box widget is working properly on your blogger blog.

You can choose any of the methods to add facebook like box widget in blogger blog. I recommend the first method because it is easier than the second one. Both the method will do the same task for you. If you like this post then please share it.